Bikemap Test: App and tour planner are presented in detail in this article! Full instructions and my Bikemap experience. On the web you can plan your next bike tour with the Bikemap route planner and navigate comfortably with the app.
Bikemap Experience:Beginner friendly and comfortable. Available for iOS, Android and the web. A navigation app specifically for cyclists. That’s how Bikemap can be summarized. The Bikemap universe includes: Tour suggestions and route planners on the smartphone and on the web.
Planned routes and made tours are automatically synchronized in the Bikemap account.
Bikemap Highlights
These are the Bikemap highlights. You can find out more about all the functions here in the Bikemap test:
✅ Bicycle navigation: Navigation specifically and exclusively for cyclists
✅ Tour suggestions from the community
Offline map download possible (Bikemap Premium)
✅ Beginner-friendly operation
✅ Integration with smartwatches
In the article you will also learn more about the premium features and whether Bikemap Premium is worth it.
Bikemap – bike map & bike navi for iOS, Android, web & smartwatches
You can use Bikemap on iOS, Android and on the web. With your Bikemap user account, planned routes and completed tours are synchronized between your devices.
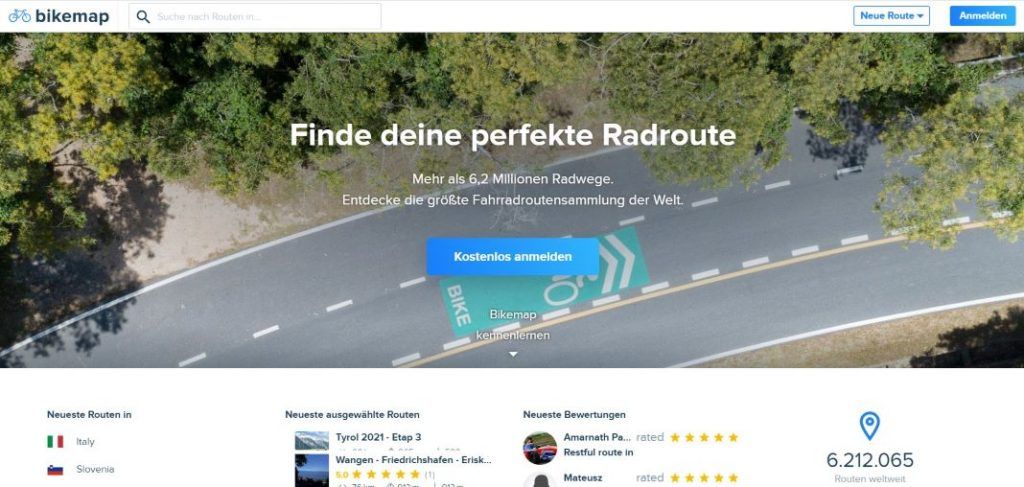
Bikemap App Test: The app with the basic functions is free. Advanced functions of the bike navigation app are available with Bikemap Premium.
Bikemap free or premium?
What features does Bikemap Premium have and what does Bikemap Premium cost? All advantages of Bikemap Premium at a glance:
✅ Offline cards
✅ Offline navigation
✅ Route calculation optimized for more bike types (Bikemap free: balanced and fastest, Bikemap Premium: also for road bike and mountain bike).
✅ Route preview in 3D
✅ More map styles (Bikemap free: Standard and OpenStreetMap, Bikemap Premium OpenCycleMap, 3D, night).
✅ Preferred support
✅ Fall detection on iOS
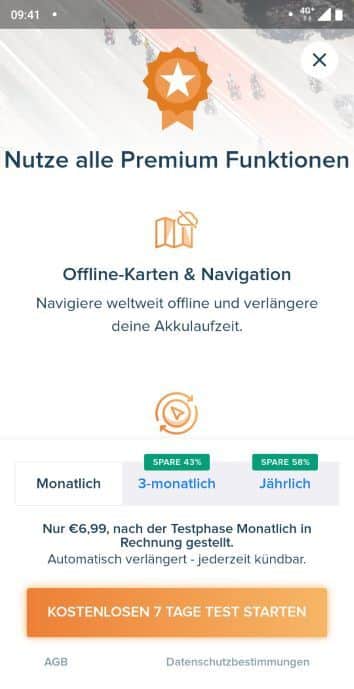
What does Bikemap Premium cost? Bikemap offers several payment options:
- Subscriptions with payment method: Monthly, quarterly and annually. With annual payment Bikemap costs 99 Euro per year*.
- For a lifetime license you pay 99 EUR*.
*Prices: Status September 2020
Bikemap Premium is linked to your Bikemap account. If you own Bikemap Premium, the functions are available on all your devices – even when changing devices.
That’s how useful the Bikemap Premium features really are:
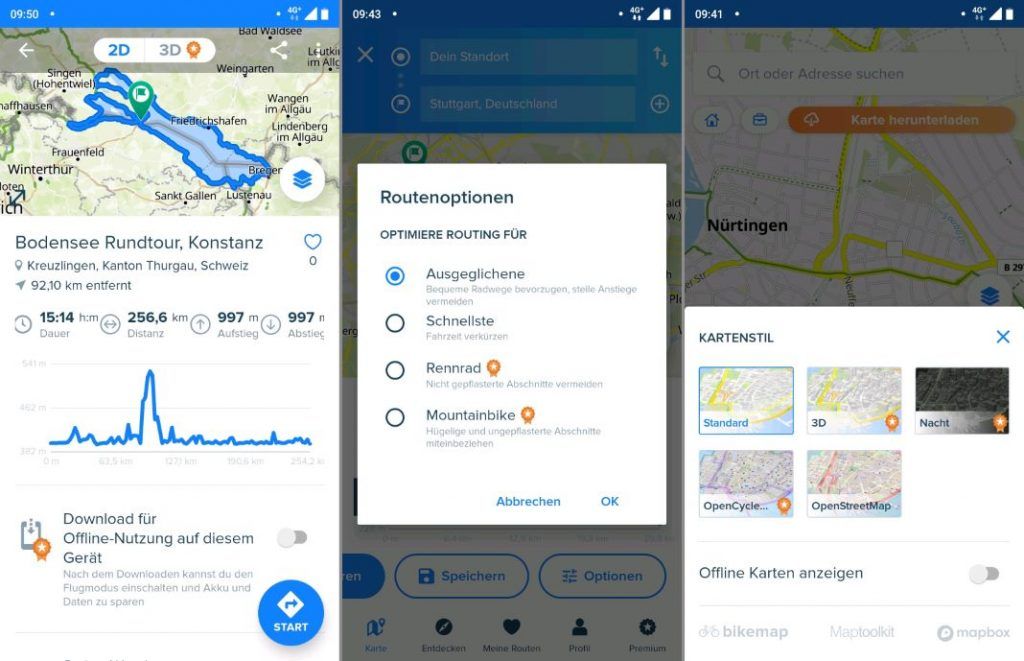
- Offline maps and navigation: offline maps are the most important and certainly most popular feature of Bikemap Premium. Maps and routes can be downloaded worldwide for offline use. Navigation for pre-downloaded content works completely offline. This saves battery power and is especially helpful or even necessary in areas with poor network coverage and on vacation.
- Bike type optimized routing: In the free Bikemap variant there are the activity profiles „balanced“ and „fastest“. In Bikemap Premium, road bike and mountain bike are also available as a route calculation method. Very helpful! The special bike maps Standard and OpenStreetMap of the free Bikemap version are the best. The premium maps „3D“, „Night“, „OpenCycleMap“ I consider dispensable.
- The fall detection is an iOS exclusive feature and I have not tested it.
- The 3D route preview visualizes a route in an exciting way. A function I like to use.
Overall, the premium features are worth the money. Especially the offline maps and offline navigation. The prices called for the subscription are fair. Very exemplary is the possibility of a one-time purchase.
Installation and Login
Bikemap is simply downloaded and installed from the Google Play Store or iOS App Store. The first time you start the app, the login screen appears. Here you can create your Bikemap account. You cannot use the app without a Bikemap account.
The following account creation options are available Double.
- Login with Google Account
- Login with Facebook account
- Login with Apple ID
- Login with e-mail and password
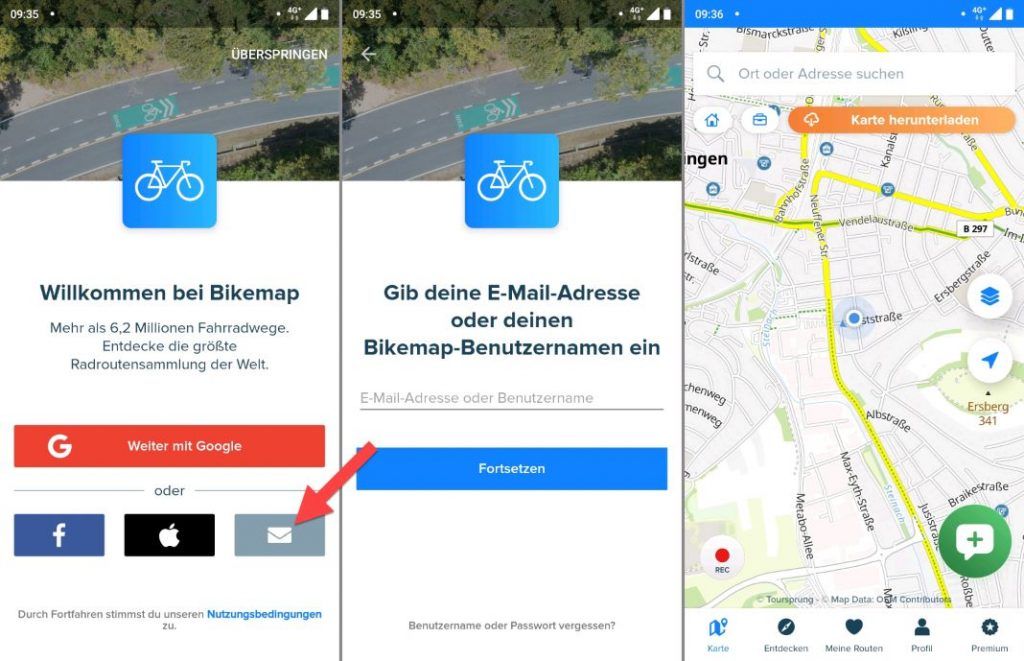
Account creation and login with email and password are my favorite. Bikemap can be linked with external services like Facebook at any time. If you are logged in with your account you will immediately see the main view with the large maps. The user guidance is very intuitive and therefore immediately understood. I’ll explain the main functions now:
- Search slot „Search city or address“ above: Enter city or address and quick navigation Search slot „Search city or address“ above:
- Home Button: Home Button: Start navigation to home address
- Business Bag Button:Business Bag Button: Start navigation to business address
- Download map button: Open Map Download Manager and download maps offline.
- Map button: Quickly switch between different map styles.
- Navigation arrow: Change the orientation of the map (to the north) in the direction of view.
- REC button: record driven route, without navigation.
- Plus button / + button / news button: News + button: Add places (POI) to Bikemap
Menu at the bottom of the screen:
- Map: Map view e.g. for quick navigation
- Discover: Discover tour suggestions e.g. popular MTB routes up to 50 km
- My routes: Access to saved made and recorded routes and offline routes (Bikemap Premium function).
- Profile: Display your own Bikemap profile and change data, e.g. data storage location for offline maps.
- Premium: Buy Bikemap Premium
Discover bike tours with the Tour Search.
You can access the tour search with the menu item „Discover“.
Tour search in the Bikemap App
Bikemap offers you a large number of tour suggestions of varying quality. All tours are created by Bikemap users and there are no editorially created tours at Bikemap. Currently Bikemap has more than 6.2 million tours in its database, there should be something for almost everyone 🙂
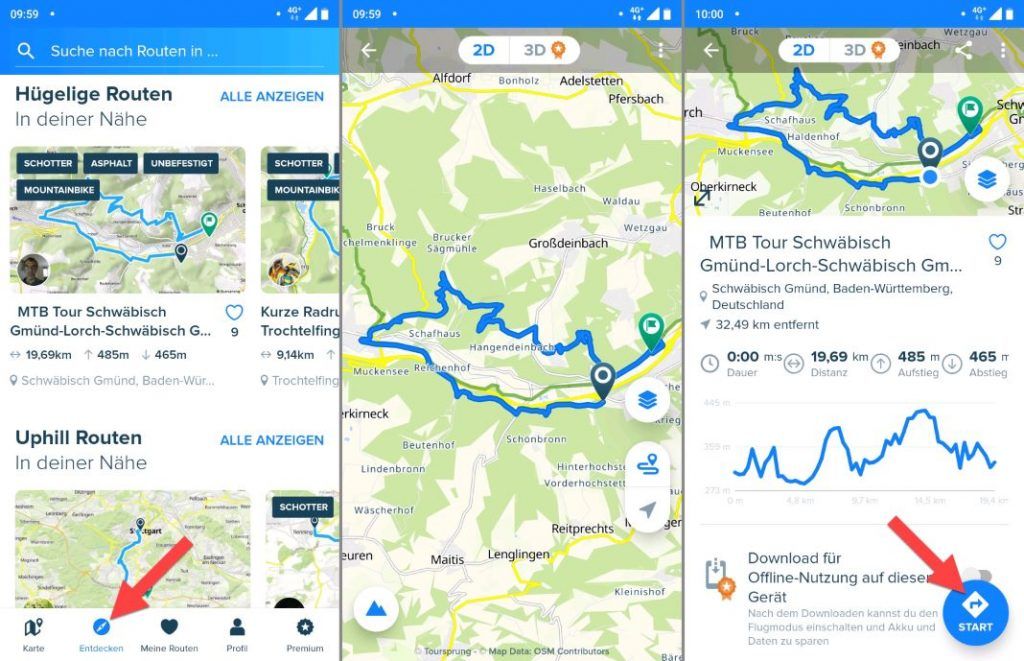
Bikemap tour search – how to search? At the edge of the screen is the search for routes in search slot. You can either display tours near your GPS position or enter a location in the search slot.
By default, the Discover menu already shows you routes from different categories. The categories are: Popular, Flat, Hilly, Uphill Downhill.
With All displays Bikemap shows you all available routes. The routes can be sorted according to:
- Relevance
- Popularity
- Length (shortest)
- Length (longest)
- Ascent (lowest altitude meters)
- Ascent (most metres in altitude)
One of the most useful functions is „Filter“: with filters you set, you can find a tour that fits your selection. The following: Filters can be set:
- Route length: 0 to more than 500 m
- Round trip: Yes or No
- Ascent: 0 m to more than 500 m
- Search by title
- Bike type: Mountain bike, City bike, Road bike
- Surface: Asphalt, Unpaved, Gravel
Tap „Done“ and the matching tours are displayed
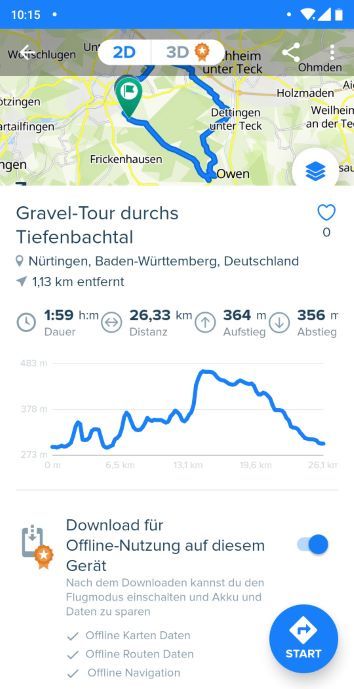
Bikemap Tour Search – Show Tours: depending on which view you are in, the tours are displayed in a list or a grid arrangement. Tap the desired route and you will see a preview with the important details of the route. This will give you a good idea of whether the route suits you or not.
Displayed is a preview on the map and values such as it takes dance ascent in meters of altitude and descent in meters of altitude. An elevation profile is also displayed.
Bikemap Premium users can view a 3D preview of the route.
Maintain bikemap offline route: you can make the route available offline with the Download for offline use slider on this device.
You can start the navigation directly with the Start button. Bikemap navigates you to the start of the route or to the next possible one. On Route. Very comfortable.
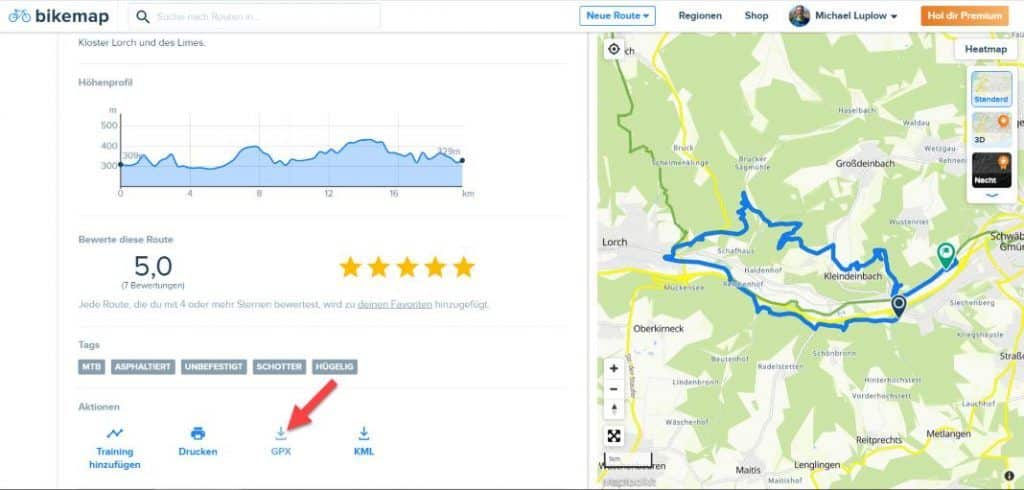
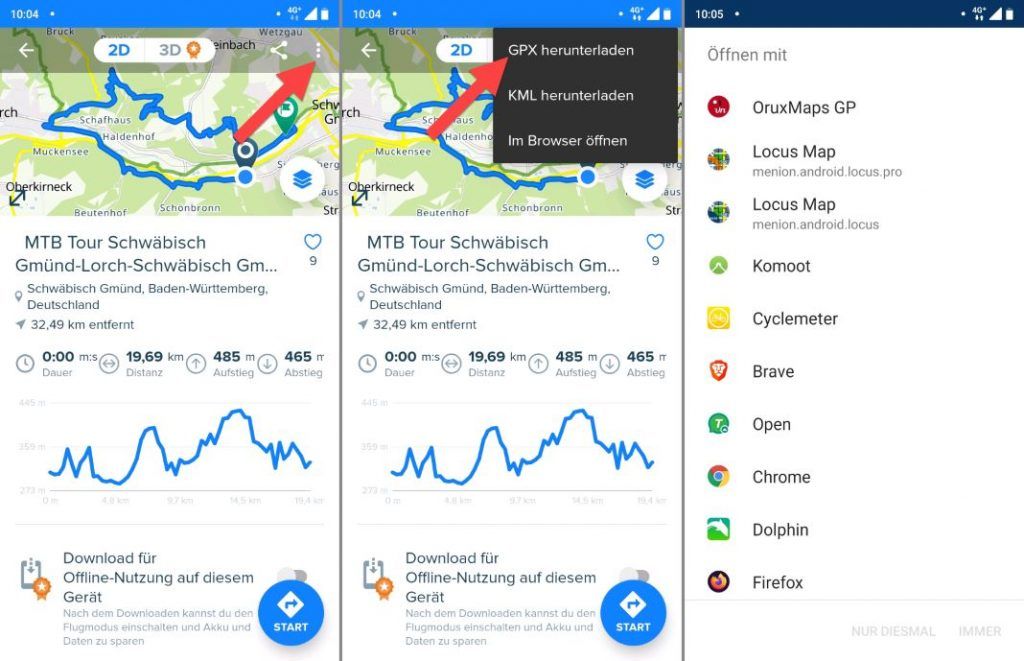
Bikemap GPX download: a GPX export or KML export is also possible. The option is available via the three dots at the top of the screen. The GPX download is available at Bikemap in the Android app and on the web. On the iPhone there is no option for KML & GPX export.
Route planner
Create bikemap route:Use the route planner in the app and on the web to plan your next bike ride. The Bikemap route planner is suitable for quick navigation as well as for planning longer routes. It’s easy to use and all changes are synchronized with your Bikemap account.
Unfortunately, the Bikemap route planner does not offer full flexibility. The planning options including the restrictions are shown in this section.
Route planner in the app
With the Bikemap route planner on the web, you can plan your next bike tour on the go. Internet access is required for planning. With Bikemap Premium offline navigation is also possible. These are the functions of the Bikemap route planner:
Fast navigation by destination input or selection on map
You can create a route and start navigation especially quickly with Bikemap: You only need to enter one location. Your current position is used as the start or you can enter a start of your choice.
In the menu „Map“ the navigation can be started:
Either by entering your destination in the search slot „Search city or address“ or by long tapping on the destination on the map. Bikemap immediately calculates the route and displays it on the map. Now data on the calculated route is also displayed Duration, length, type of cycling route, metres in altitude upwards and metres in altitude downwards.
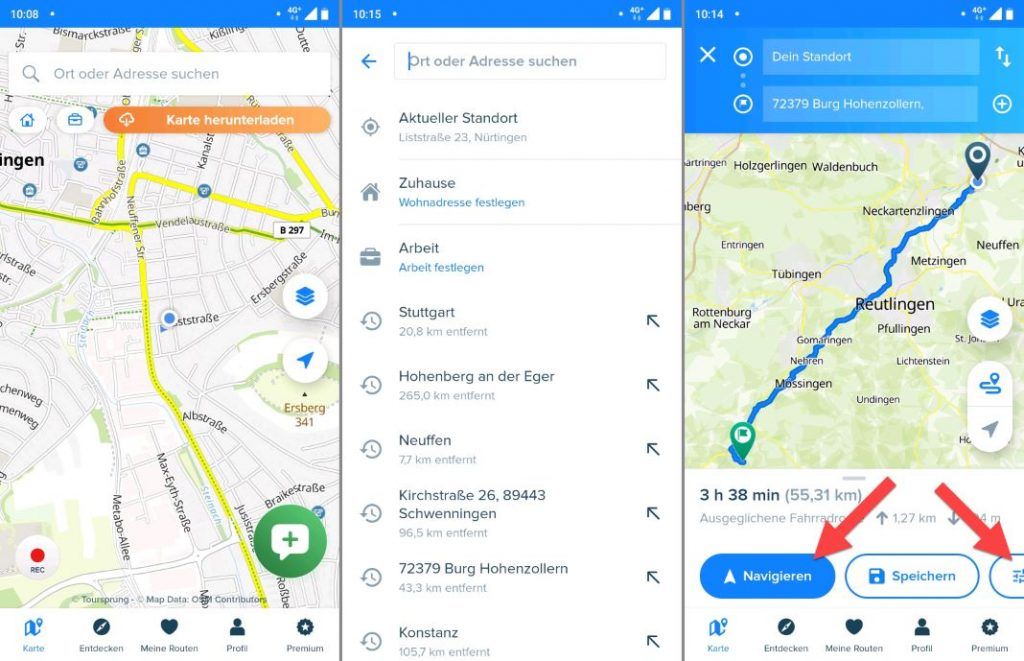
There are three important options at the bottom of the screen:
- Navigate: Starts navigation
- save: Saves the route in your Bikemap profile.
- Options: let’s you choose the route options i.e. the bike type (balanced, fastest and for Bikemap Premium users: road bike and mountain bike).
As said the navigation is started with the „Navigate“-button.
The route calculation provides good results and depends on the set route options, i.e. if mountain bike is set, routes in the terrain are preferred and if road bike is set, asphalt-heavy routes are calculated.
Detailed route planning with Bikemap
Detailed route planning with Bikemap is possible to a limited extent on the smartphone. The Bikemap route creation works similar to the Google Maps bike navigation: The fine tuning of a route works exclusively by setting between points similar to Google Maps. Unfortunately, moving the track by drag-and-drop is not possible. Likewise, you cannot drag and drop points that have already been set. A really detailed route planning with Bikemap is therefore unfortunately not possible.
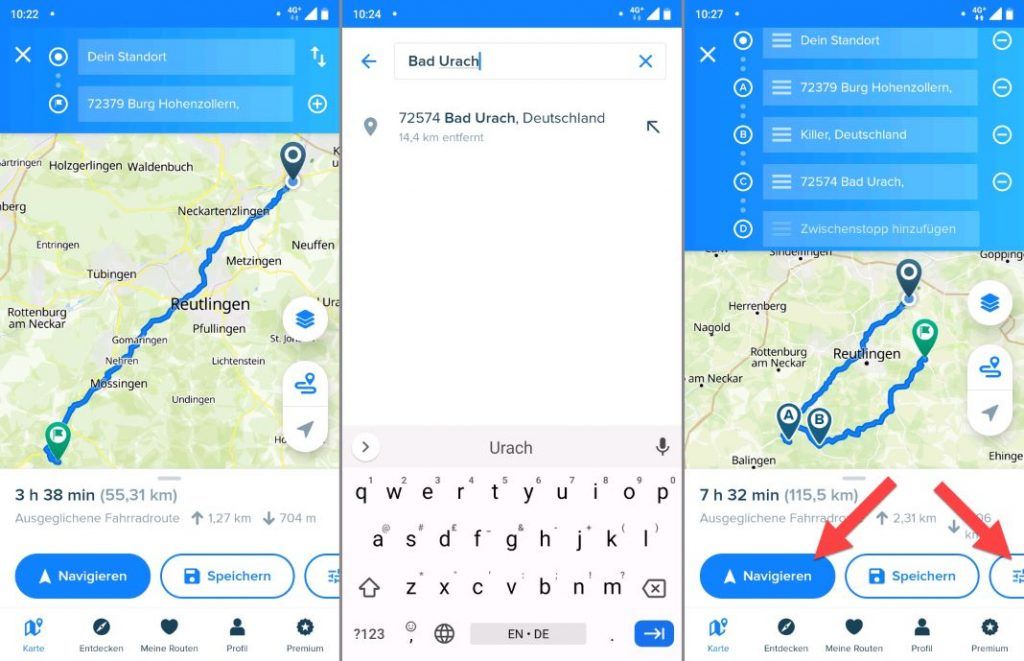
This is how you go about setting intermediate points:
- Tap on the plus symbol and enter your new destination or the point between. Alternatively, your new destination or the one between. Set by long tap on the map.
- You can repeat this as often as you like.
- The added points are always added to the end of the route. If you want the points to be between points in the route, you must then move them to the middle of the route using the handle symbol.
Route planner on the website
On the website you can reach the Bikemap route planner via the link „Plan from A to B“ or you can visit the direct link to the Bikemap route planner.
The Bikemap route planner on the website has more features than the route planner in the app. The Bikemap route creation is more comfortable on the web. There are improvements especially in setting intermediate goals. This makes it easier to plan long and complex bike rides. These are the functions of the Bikemap route planner on the website.
Fast navigation
Tip: with the enlarge button, the map is completely large and fully displayed in the browser.
Create a bike map route: Plan a navigation quickly, that is possible with the bike map route planner in the browser. At the top left are the search slots for start and finish:
- Enter start location or address
- Enter destination or address
Bikemap immediately calculates the route and displays it on the map. You can now save the route with the Save Route button. Through your Bikemap account, the route will automatically sync with the Bikemap app and start navigation with the app.
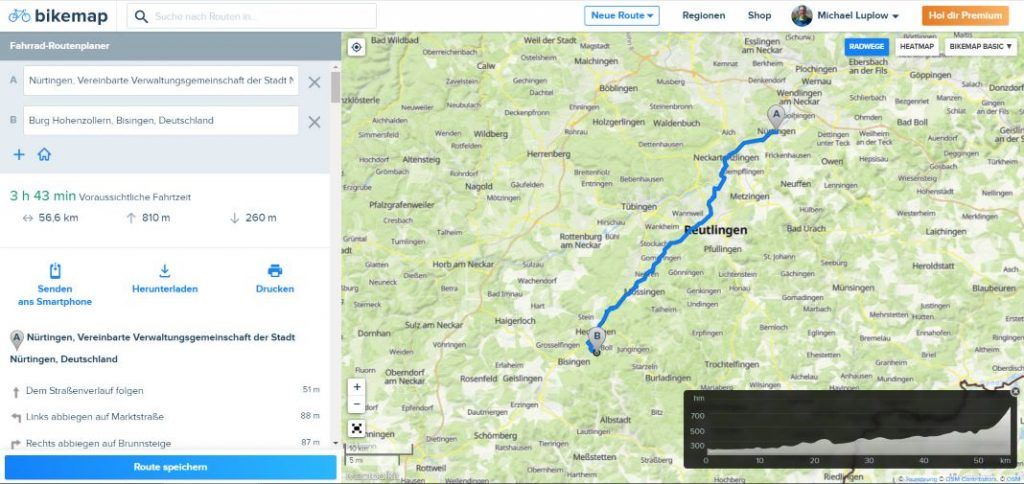
Plan navigation on map
You can add multiple intermediate points to your navigation with the Plus button (+ button).
Routes with intermediate destinations can be created in this way (Bikemap Create route with intermediate destinations). Bikemap automatically calculates a suitable route including the intermediate destinations and displays the result on the map.
Fine planning of the route: In the Bikemap route planner on the website you can plan your route in great detail. Click on your route on the map to add a stopover. Drag and drop the point to your desired spot on the map. Bikemap recalculates the route within a few seconds.
Note: Intermediate destinations added in this way are each added as a new destination i.e. to the end of the route. However, you probably just want to create an intermediate destination by clicking on it. To do this, drag the newly created waypoint in the list of waypoints from the end of the route to the middle of the route at the desired position.
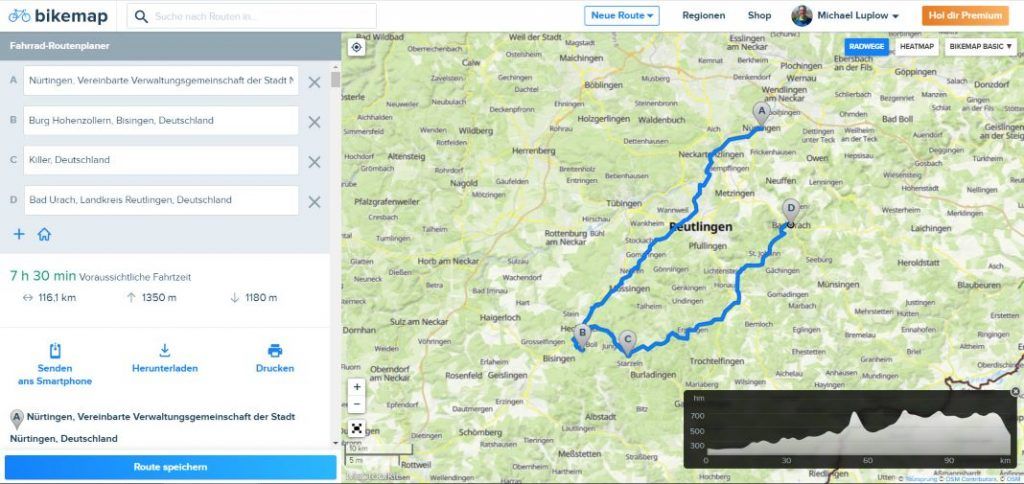
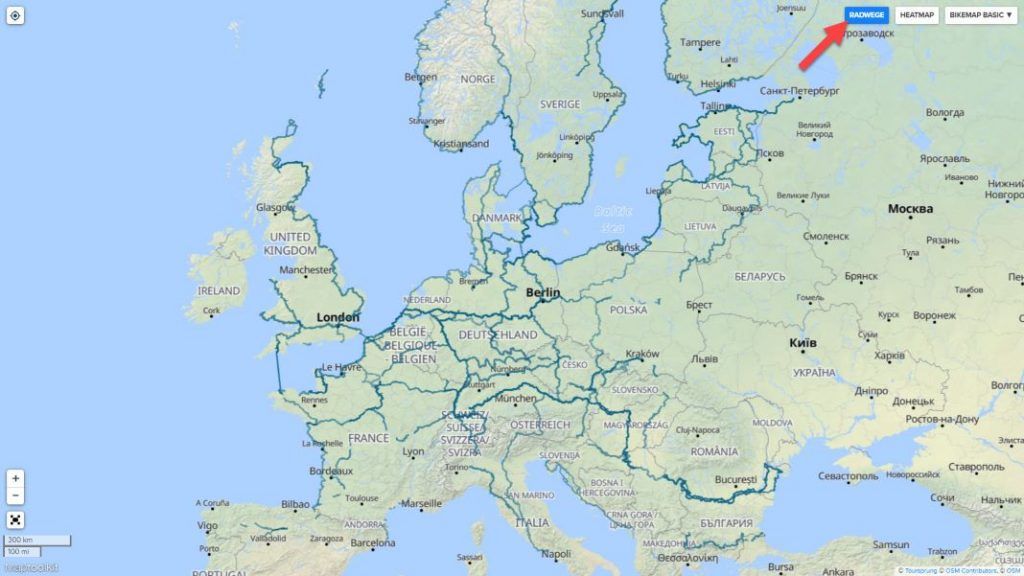
Show Bikemap cycle paths
Bikemap has a large bike network in its database. Many long-distance hiking trails and also a large number of small and local bike trails are in the Bikemap database. With the cycle paths button you can switch the display of cycle paths on and off.
The cycle paths are also marked in colour. That’s what the colors mean:
- Green: Bike path is exclusively for cyclists
- Yellow: Bike lane at the roadside
- Red-Brown: normal road without bike lane
Bikemap Heatmap
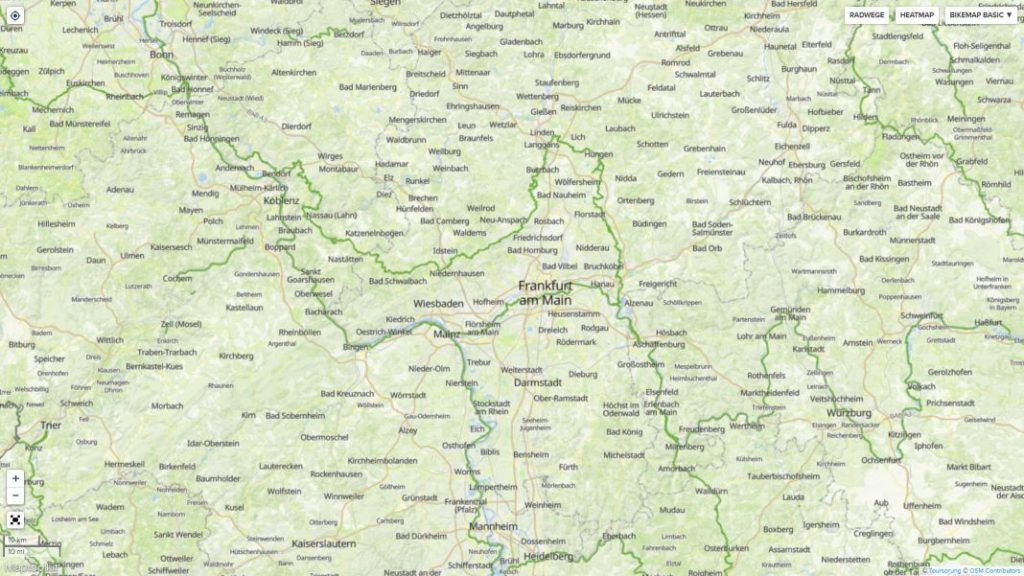
The Bikemap Heatmap shows the most popular routes of the Bikemap community. With this function you can orientate yourself on the most frequented routes in your desired area. One click turns the heatmap function on the Bikemap route planner on and off.
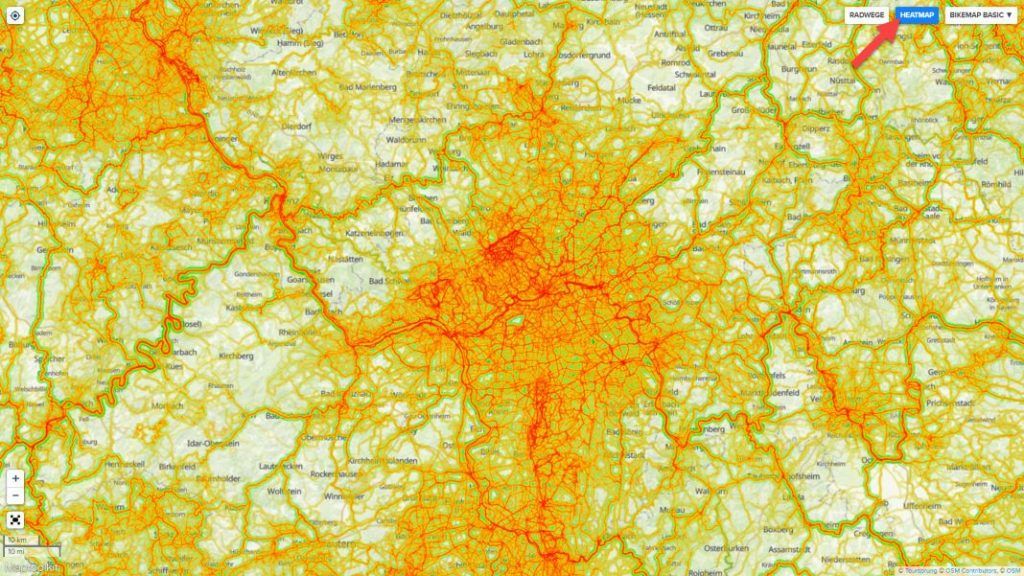
Popularity ranges from red for very popular, to orange, to yellow, to green for lightly traveled. According to Bikemap, more than 300 million kilometres were ridden by more than 1 million Bikemap users.
The map view shows the same section on the map. Each with heatmap turned on and off.
Maps
Like many bike navigation apps, Bikemap uses the proven Open Streetmap maps as a basis. Depending on the map style, these maps are enriched with their own layers. This provides additional information.
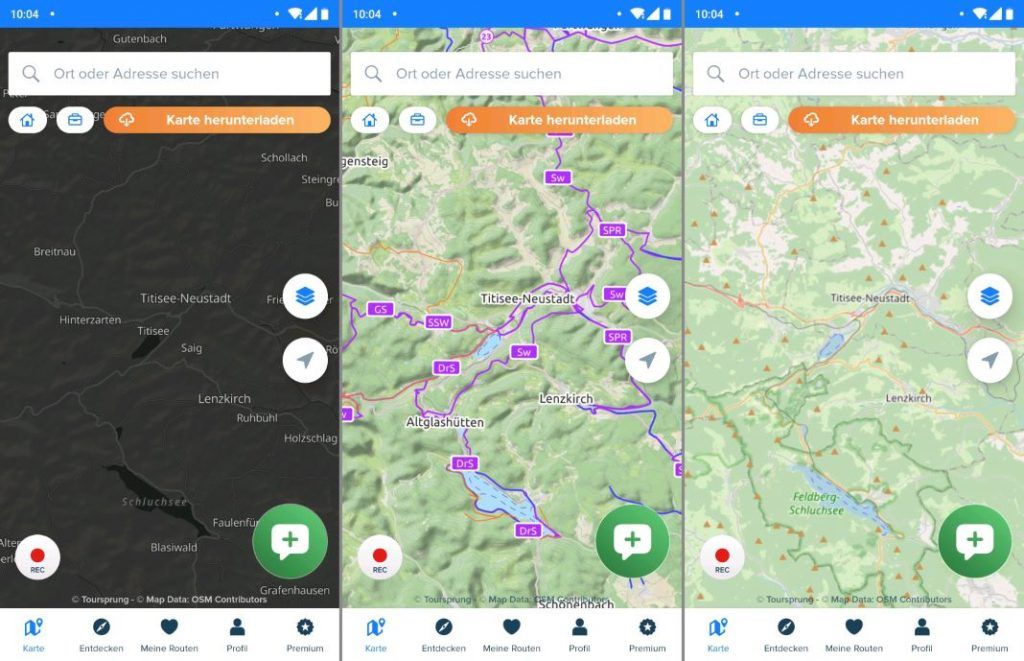
The map icon on the right side of the screen allows you to select different map styles:
- Standard
- 3D (included in Bikemap Premium)
- Night (included in Bikemap Premium)
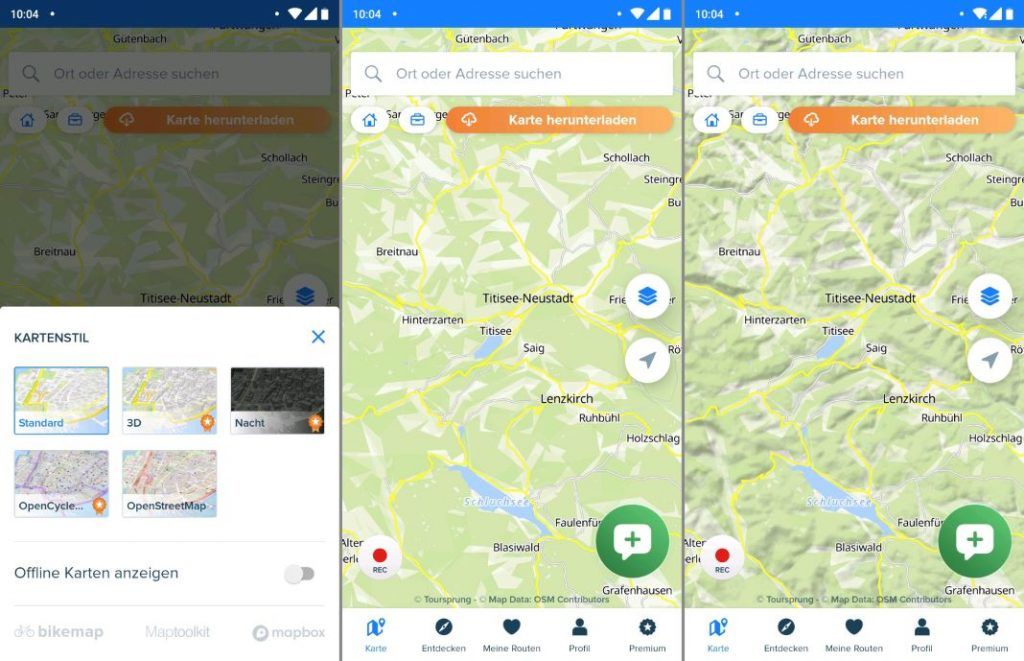
- Open Cycle Map (included in Bikemap Premium)
- Open Street Map
The free standard map and the Open Street Map is already very good for navigating. With both maps you can also usefully work in the Bikemap route planner. So an upgrade to Bikemap Premium because of the maps is not absolutely necessary.
Bikemap Offline Maps Download
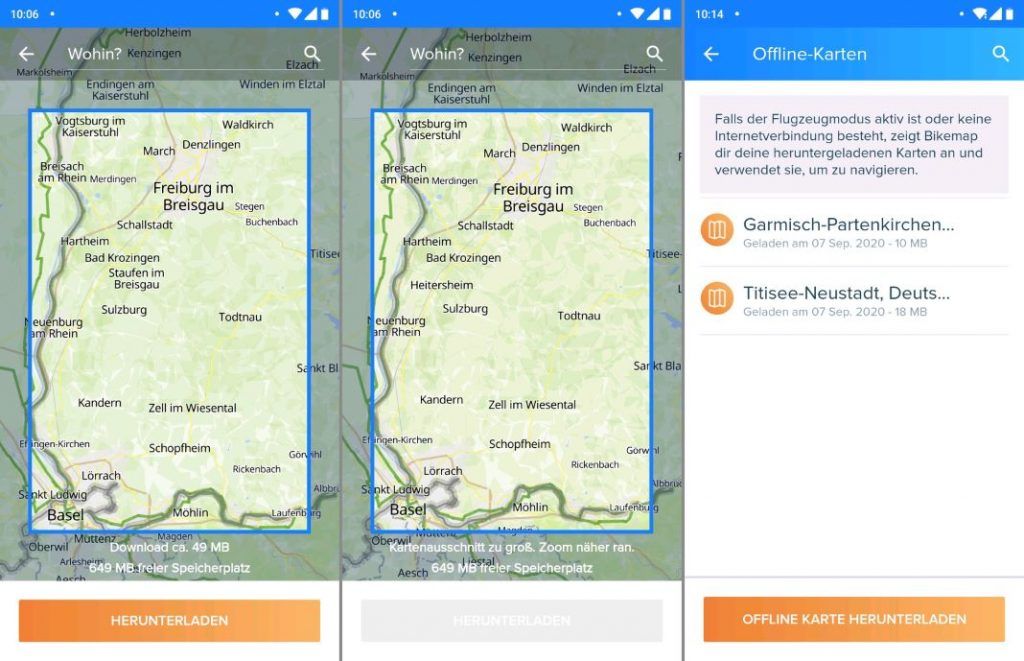
Most useful premium feature of Bikemap. This is how the offline map download works: In the menu at the bottom of the screen, switch to the „Map“ menu:
- You will be shown the map and immediately see a big orange Download Map button.
- Move and zoom the map section to the view of your choice
- Now tap on the „Download map button“.
- Now you can give a name to the downloaded area and start the download.
- Your downloaded maps are displayed in the Premium & Offline Maps section. There you can view the maps and delete the offline maps if you wish.
The maximum downloadable area is 49 MB. If the range would be 50 MB and more, the download is not possible. The download of larger areas for offline maps for extended tours or even country crossings thus turns out to be cumbersome and time-consuming.
Tours can also be downloaded for offline use: To activate the offline functions, simply move the slider. Then the download of the route is started.
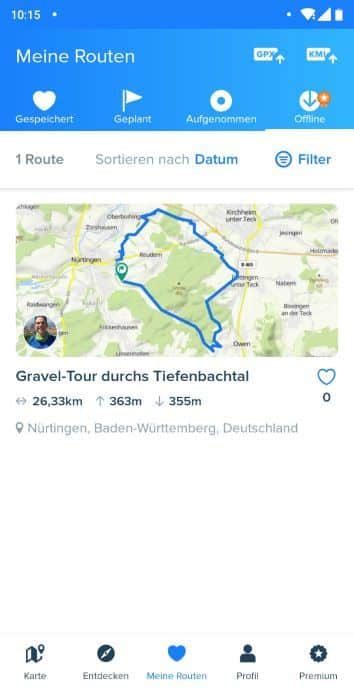
In the „My routes“ menu, the routes available offline are displayed:
My routes > Offline
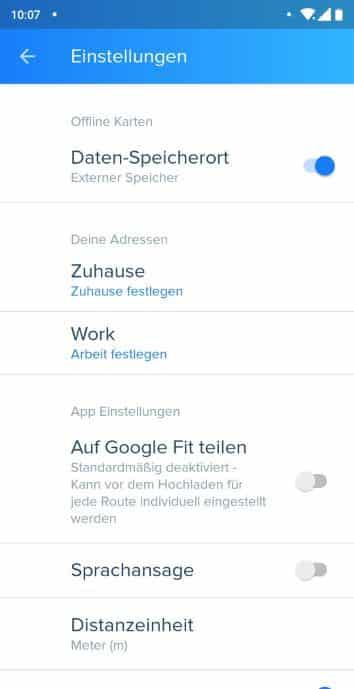
Save location in the Bikemap App Test: In the settings you can set the save location for offline maps. However, on my ZTE Axon 9 Pro, saving the map data to the external SD card does not work.
The offline maps are still stored on the internal smartphone memory.
Although the „Data location – External storage“ option is enabled.
In premium version there are improvements in offline map management:
- Describe improvements
- Record route
- When navigation is active, Bikemap automatically records your route.
- You can also record the route as a track without navigation:
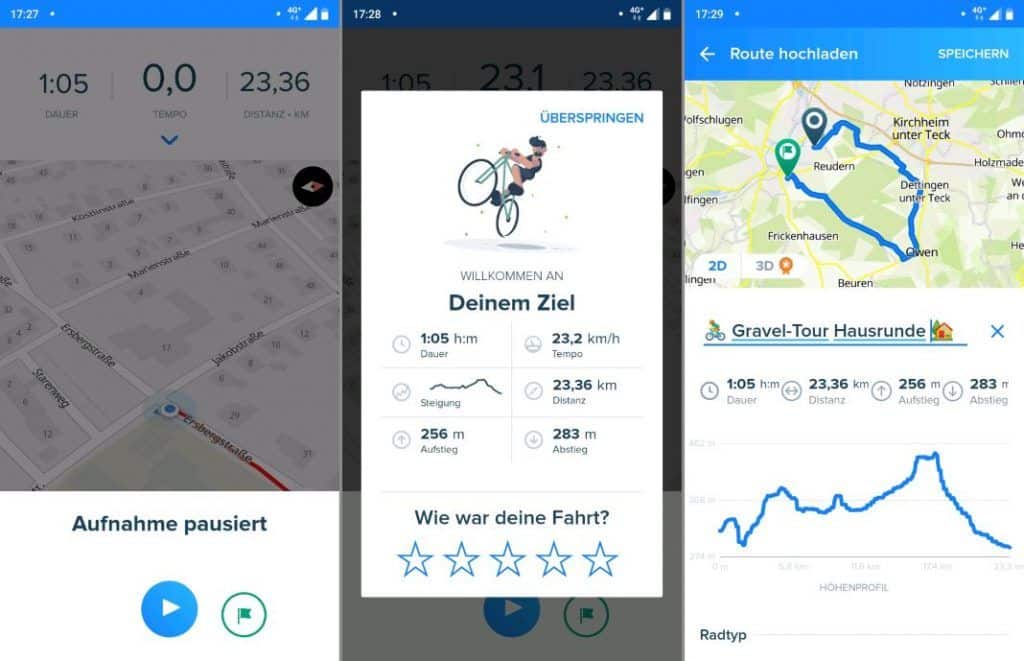
Available is the option in the menu card there is the big red „REC button“. Tap Reck and cycle away. If you want to stop the recording then tap on the pause icon and tap stop. You can then give the recording a star rating or simply skip the rating.
Access your recording in the „My routes > recorded“ menu.
Navigation with Bikemap
When navigating, Bikemap displays a fancy map with 3D effect. Unfortunately, gradients are not shown on the map itself. Even the steepest climb is shown flat.
Navigation
When navigation is active, the screen is divided into three areas:
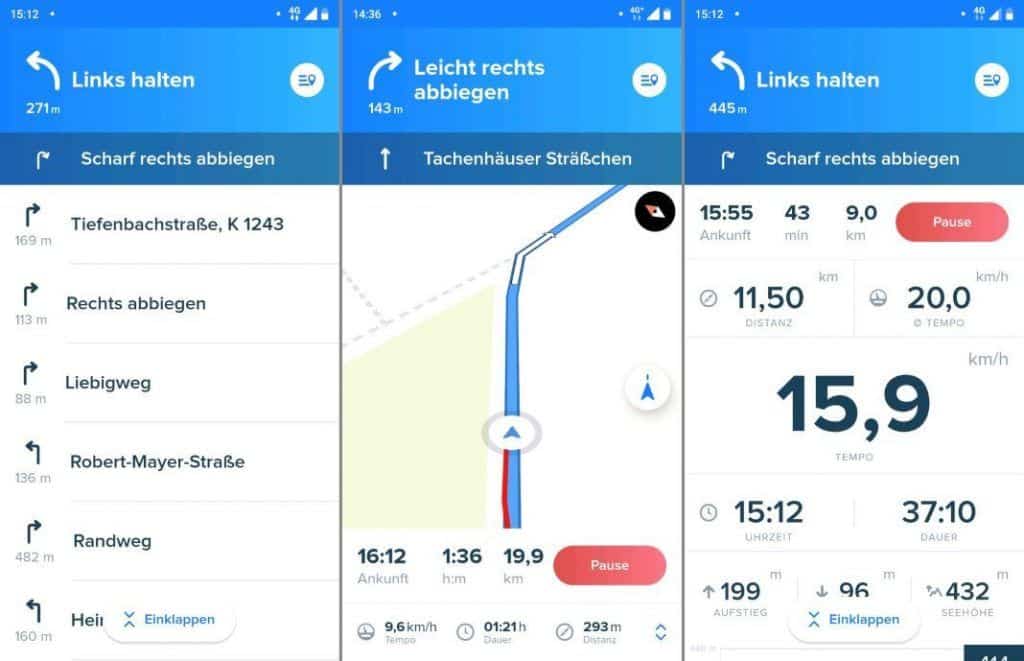
Data (area below): Data fields for speed duration and distance. Tap it to go to a page with detailed data fields. Unfortunately, neither the three values in the navigation nor the detail data fields page can be adjusted. Bikemap fortunately already displays useful information here.
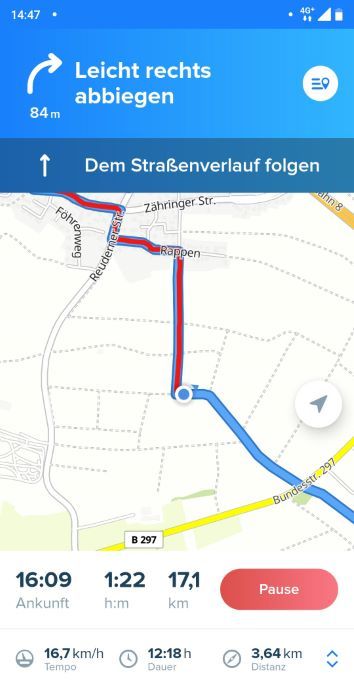
Turn indications (area above): the next turn indication and the turn indication after next. Tap on this area and you will get a list with all the turn-by-turn directions and for active navigation.
Map (center area): The already described fancy 3D map is displayed large and centered.
A tap on the bottom screen shows the data page. The following information is displayed:
- Arrival time at the finish
- Minutes to the finish
- Kilometres to the finish
- Kilometres travelled
- Distance travelled in kilometres
- Average speed in km/h
- Average speed Current speed
- current time
- Duration of the activity
- Altitude meters upwards
- metres in altitude downwards
- Current height
Scroll down the data page and get a real-time elevation profile (recorded elevation).
Turn-by-turn directions for the next turn and the turn after that are also displayed on the data page.
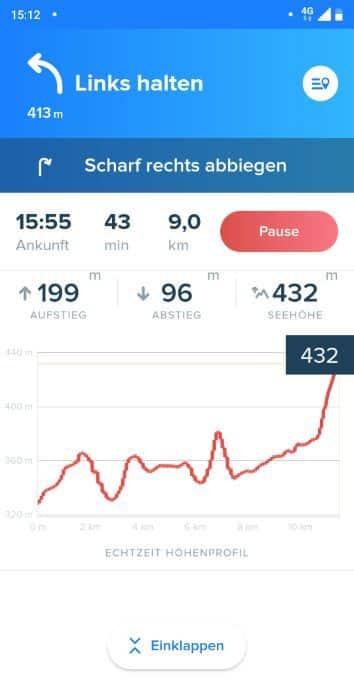
Recalculation after route deviation: If you leave the route while navigation is active, Bikemap will calculate a new route.
Voice prompt during navigation
Navigation is supported by clear voice prompts. To receive voice announcements, the „Voice announcement“ option must be activated in the settings:
Profile >Gear icon (top right) > Voice announcement
You can also use the volume buttons on your smartphone to adjust the volume of the voice prompt or mute it completely.
Record and save route quickly without navigation
You want to get going quickly, already know the route and want to record your tour?
That’s what the red REC button at the bottom left is for: just tap it and go. Bikemap starts directly the route recording without navigation.
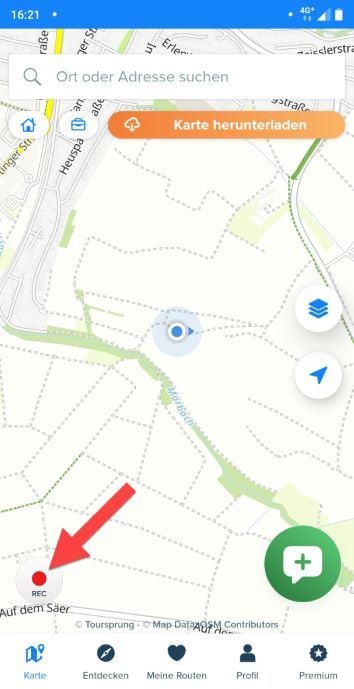
With active fast navigation Bikemap shows the large bike map on the screen. The map helps you find your way around and plots your route. You also have access to the data page including the ridden altitude profile when recording the route.
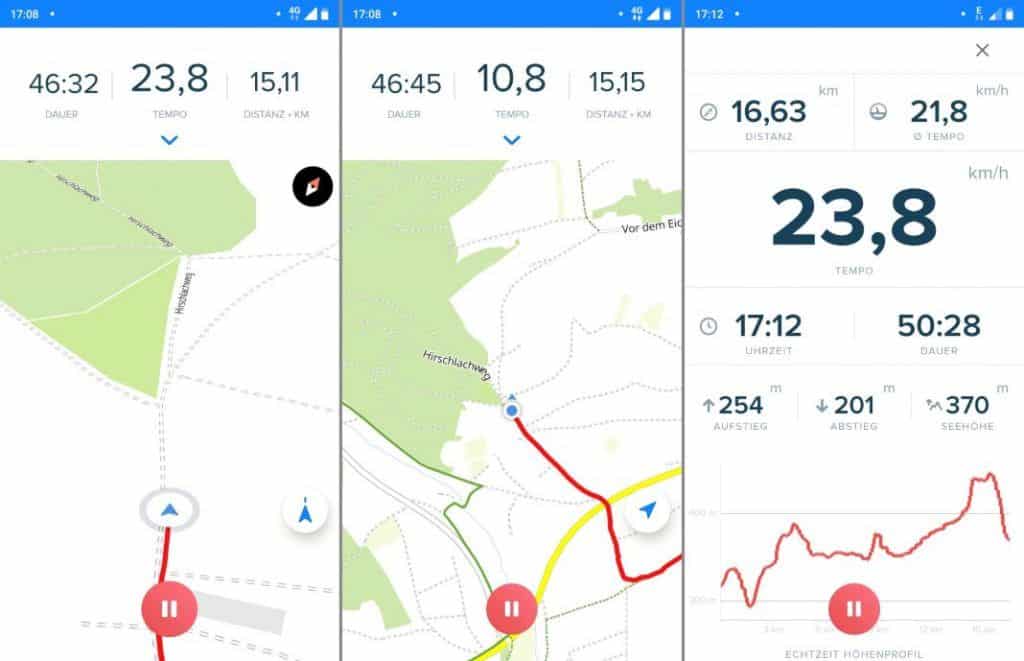
By tapping the red pause button at the bottom of the screen, you can pause and save the recording.
Bikemap shows a summary of the route you have ridden. You can rate the ride with 1 to 5 stars and enter data about the ridden route (picture upload, suitable for which type of bike? route condition).
If everything fits, you can save the route and upload it.
Bikemap GPX Import, Export & Transfer
Bikemap is able to import and export XML and KML files. How this works in detail you will learn in this section.
GPX import in the app
For your next bike tour you want to use the Bikemap Navigation. You have the route of your bike tour as a GPX or KML file. GPX files are often made available for download on the official pages of the long-distance hiking trails or in online tour portals.
Importing is available in the Bikemap app and on the web, and here’s how it works:
For Android
There are two possibilities for the GPX import to Bikemap:
GPX import to Bikemap with file manager
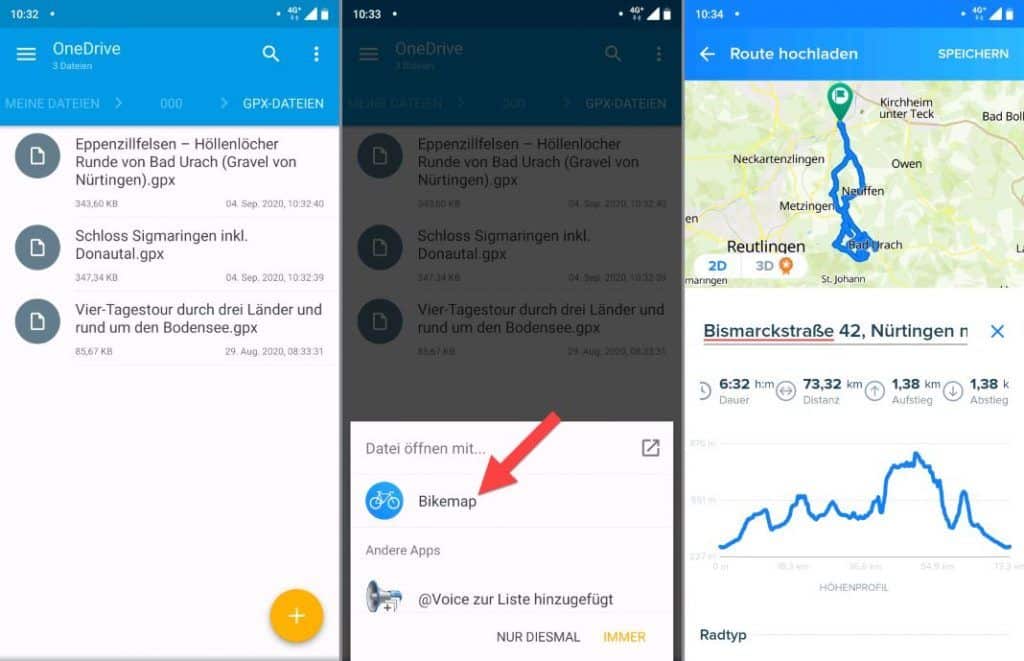
- Transfer the GPX file to your smartphone and open it with a file manager. Alternatively, upload the file to the cloud storage of your choice (e.g. Dropbox or OneDrive) and open it from there.
- Now the menu „Open file with…“ appears.
- Choose Bikemap
- The GPX file is imported into Bikemap. Now you can name the route, upload photos and save the route.
- Access to the route you have planned in the menu my routes >.
- Tap on the route to open it and you can start the navigation.
GPX Import to Bikemap in the Bikemap App
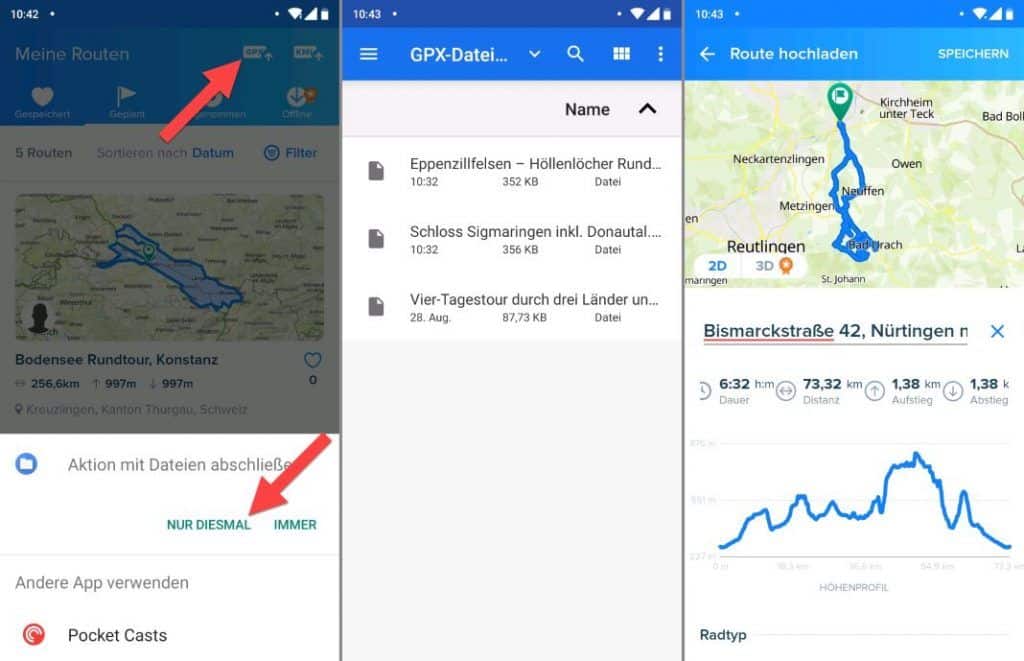
- The GPX import and KML import is available in the „my routes“ menu.
- In the upper right corner there are two icons: XML Import and KML Import
- The two icons have the same function. With the XML import icon you can import XML and KML files. With the KML import icon you can also import XML and KML files.
- Tap on one of the icons and Android’s own file manager will open. You have access to the internal memory, any memory card, and cloud storage services set up.
- Select the XML or KML file here and Bikemap starts the import. Assign a name, upload pictures if necessary and save the route
- Afterwards you have access to the route under „my routes > planned“.
- Here you can open the route and start the navigation
For iOS
Bikemap for iPhone and iPad unfortunately does not support GPX import.
GPX Import on the Web
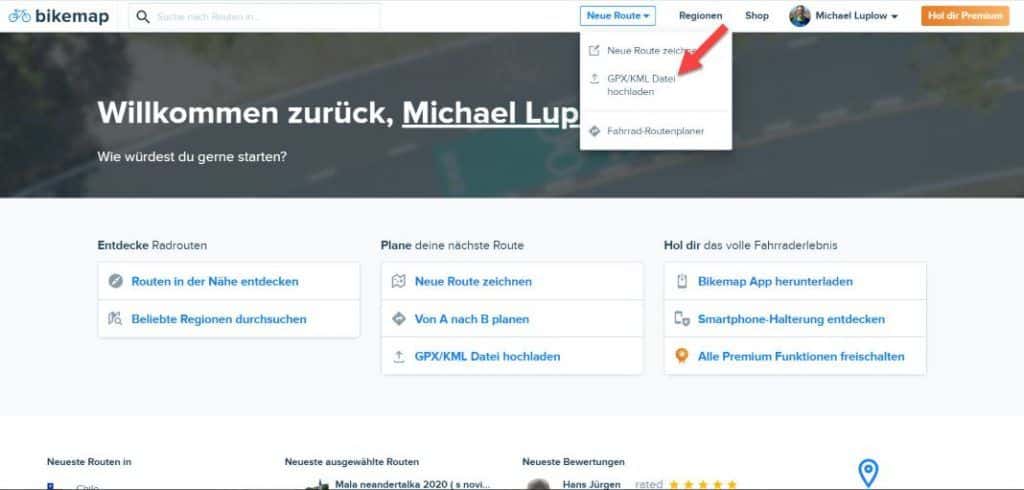
GPX export in the app
Just like the GPX import, the GPX export is also available for Bikemap for Android:
Any activity can be opened (made, planned, from the Bikemap tour search). In the menu with the three dots on the top right there are the functions:
- Download GPX
- Download KML
for the selected file format, the „Open with“>dialog will open. Unfortunately, not all apps that can handle GPX or KML are displayed here. If you want to use the exported file with your favorite app, it may require a detour.
I would have expected the „Save As“ function offered by Solid Explorer in this menu.
A detour to work flexibly with the GPX file is to open it with the Google Chrome app: Google Chrome loads the file into the download directory of your smartphone. Here you can move the file as you like, or open the GPX file with your favourite app.
for iOS
on iOS (iPhone and iPad) the GPX and KML export is unfortunately not available
GPX Export on the Web
The Bikemap GPX export is also available on the web: Just click on the Button GPX or KML in the detail view of a Bikemap route. The GPX files or KML-DAtei will now be downloaded.

Conclusion & Experience
Bikemap is a great bike navigation app and very easy to use. Even beginners can get to grips with the menus straight away. The focus on cyclists is a clear advantage and does its part to make the app easy to understand.
Once the app is set up, you can navigate away in a flash. His adjustments to the route are possible, but cumbersome. The route planner is similar to Google Maps but doesn’t come close to the Top Outdoor Navi Apps.
The navigation is clear and navigates reliably to the destination. Many important values are displayed sensibly but adjustments e.g. to data pages are not possible.
Functions like XML import and export are easily possible and very well implemented.
Interfaces for bicycle GPS Navi e.g. from Garmin or Wahoo are unfortunately missing.
Thus Bikemap is an intuitive and easy to use bike navigation app. Unfortunately, it is not quite enough for the league of the top bike navigation apps.
Alternatives to Bikemap
komoot
Komoot as a Bikemap alternative: the class leader among outdoor navigation apps. Offers multisport watch support and is similarly easy to use. Komoot has a huge route database, an excellent route planner and is also strong on navigation. Interfaces to virtually all current GPS bicycle navigation systems are available. Offline maps are also available at komoot and the route calculation is done by the komoot server. Bikemap is stronger when it comes to SmartWatch integration.
To the detailed komoot test (test & full instructions)
Locus Map as Bikemap alternative: offers significantly more functions but is much more complex to use. Familiarization is absolutely necessary (or you read my extensive tutorial 😉 ). offline maps are available at Locus Maps and also the route calculation works completely offline. Locus Map is only available for Android. Well integrated are smartwatches from Garmin and with Wear OS
Learn more about Locus Maps for cycling in the overview of TOP 35 cycling apps.
You already use Bikemap? Do you have any questions, suggestions or additions to Bikemap? Feel free to write me your comment.
Reading tip: Looking for more useful bike apps? In the article the best bike apps, you will find many exciting bike apps from the areas of navigation, training, MTB, bike computer etc.

