Strava offers many useful cycling features: Tour recording, bike computer, training analysis, route planner, virtual competitions and a large integrated social network. This article is a complete Strava guide.
You can learn about all the important Strava features in this article:
✅ Strava App: Record activities easily with the app, make the most of the social network for athletes.
✅ Strava Segment: What are Strava Segments? What is Strava KOM? How do Strava Segemte work?
✅ Strava Integration: Strava connect with Garmin, Wahoo, Fitbit and co.
✅ Strava Route Planner & Navigation: How good is the Strava Route Planner (Strava Routes) and what features does the navigation offer?
✅ Comprehensive guide for all further questions
Have a question about Strava and can’t find the answer in this article? Feel free to write me a comment & I’ll be happy to answer 😉
“if it’s not on Strava it didn’t happen”.
That’s a well-known saying among cyclists. That’s exactly how I handle all my cycling activities. These have been logged in the Strava training diary for years. So I use Strava very intensively and present you in this blog post all the important features of the bike app exactly >>
Strava app
Update: Strava has greatly revised and expanded its route planner in 2020. The new route planner is also part of this article
Stava functions
The Strava platform is available for almost all modern fitness devices: the Strava.com website, the mobile apps for Android and iOS. Strava also has numerous interfaces with almost all bike GPS navigators, smartwatches, fitness watches and activity trackers.
You have the Strava app installed? Then you need to create a Strava user account first. You can’t use the app’s features without a Strava user account.
Launch the Strava app and you will first be presented with the login screen. You can sign up for Strava with:
- Facebook login
- Google Account or
- E-mail and password
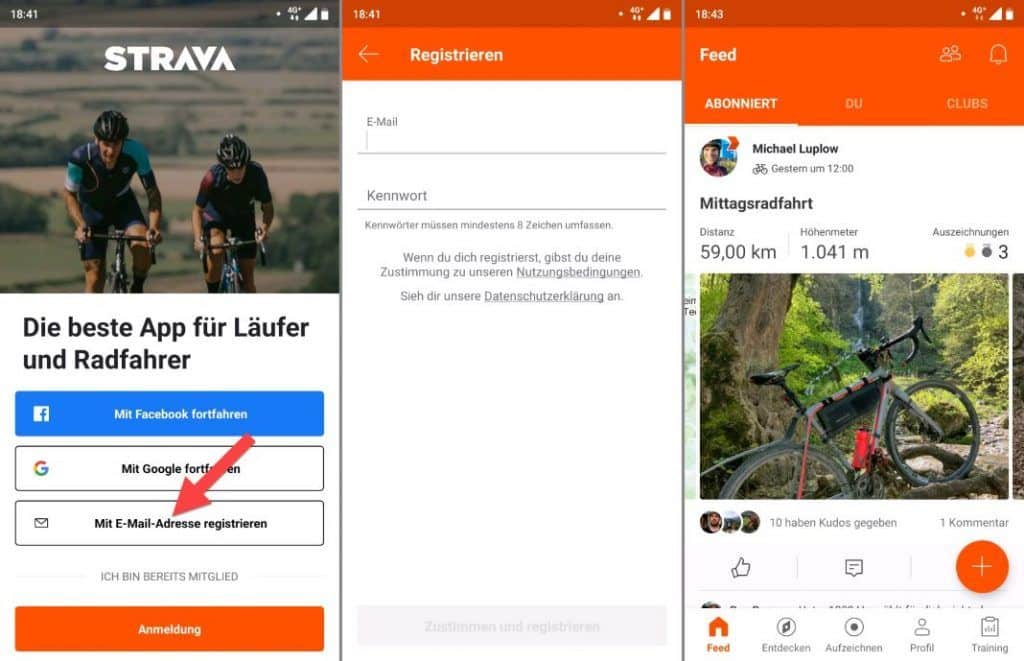
If privacy is important to you: When you login to Facebook, Strava can share information with your Facebook account (after you confirm) and has access to your Facebook friends list. I prefer a user account with email and password. There I have more control over my data and the login is not dependent on my Facebook account. You can always link Strava to Facebook later. Activities can also be shared via Facebook at any time – without any account linking.
Strava Summit (Summit vs free)
What features are available for free on Strava and what are the premium features? Strava Summit refers to the pay features in the subscription. Previously, the pay features were called Strava Premium.
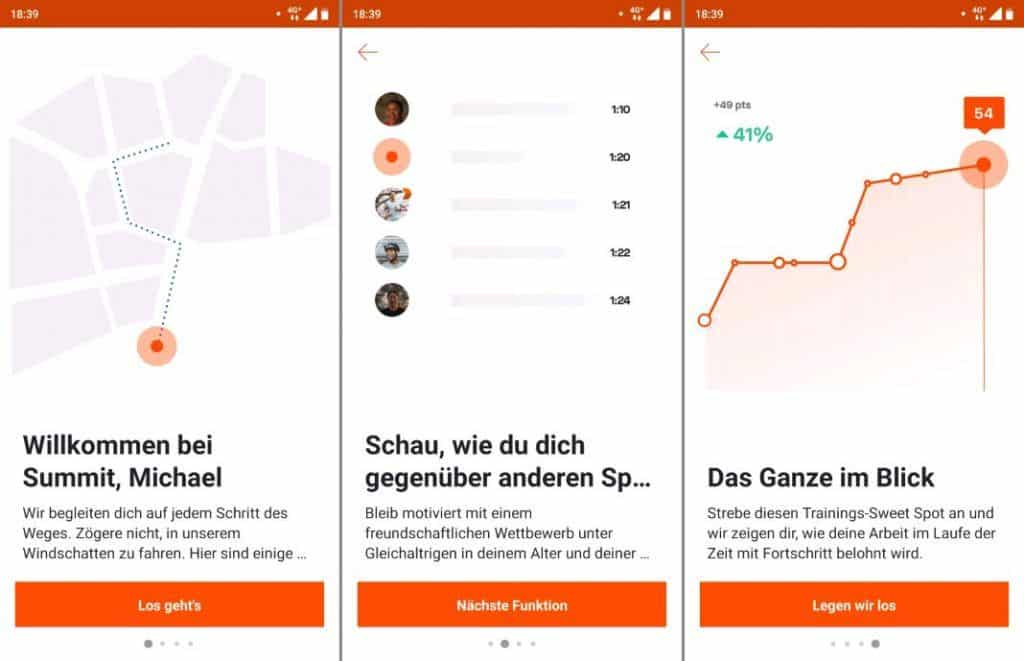
There are 3 Strava Summit packages. What do the pay packages offer and which package is worth it for you?
- Analysis: The Strava Summit analysis package offers you extensive analysis options during sport. Advanced analysis options for heart rate monitors and power meters for external power meters are provided. There are also numerous graphical evaluation options. The popular Strava Live segments are also part of Strava Summit analytics.
- Training: Strava Summit Training can help you with structured training and preparing for competitions. You can set your own goals and have access to Strava training plans. After the activity is finished, there is a function of race analysis. Best lists can be filtered.
- Security: The Strava Summit security package gives you access to the Beacon feature. What is meant by this? This allows live tracking that can be made visible to friends and family, for example. You also get access to your personal heatmap. The routes you mainly use are visually displayed.
Strava Summit cost
- Previously, the packages could be subscribed to individually
- There is no one-time purchase option – Strava Summit is always a subscription, but can be tried for free for 30 days. More on this directly below.
- If you pay monthly, Strava Summit currently costs 7.99 Eur per month for all packages and if you pay monthly
- The annual subscription costs 59,99 EUR
Mostly the subscription can be tested 30 days for free. If you only want to test Strava, then it’s best to cancel the subscription right away in the Google Play Store. If you don’t cancel, then it will automatically become chargeable after 30 days.
Record bike ride & activity
You can start an activity directly from the main view and the button for it is hard to miss. If you want to record your route only by GPS, then proceed as follows:
- Tap “Record” in the middle.
- Tap on the orange “START” button
Now your cycling tour is recorded directly by GPS.
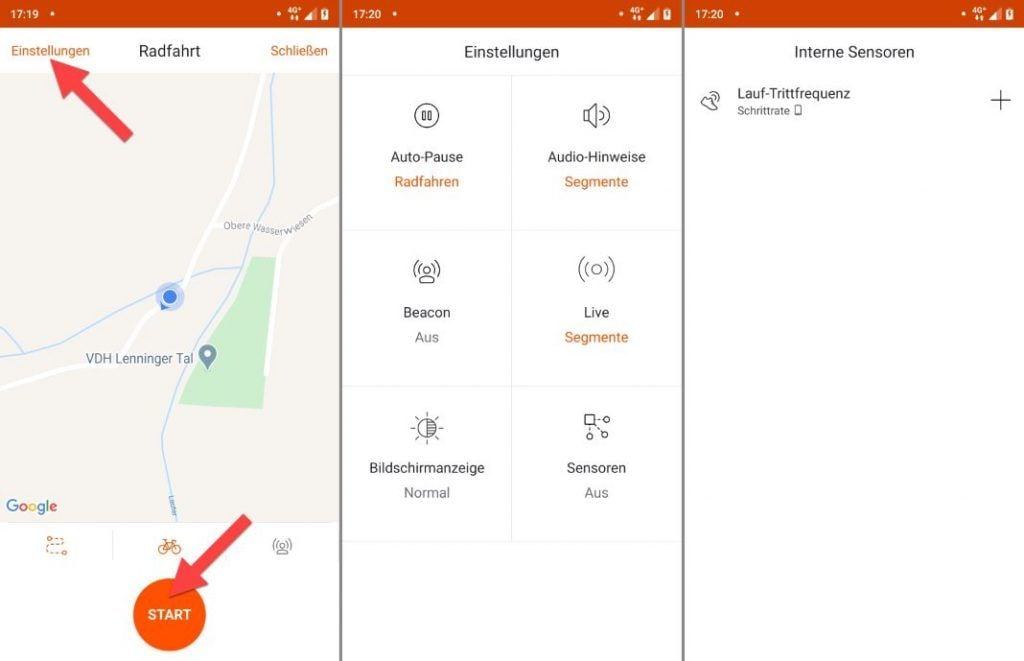
Before you tap “START”, there are also settings options. The icon row above the START button has the following functions (from left to right):
Routes: Choose a previously planned route, and let Strava navigate you. The route planner was greatly expanded in March 2020. Further down in this article you’ll find a full guide to the Strava route planner.
Sport selection: You can choose between many different sports such as running, cycling, e-bike cycling. The chosen sport is important for the statistics and also for the Strava leaderboards. You can also find out all the details in this article.
Beacon: Live Tracking Function
Pair external sensors: Earlier there was still the possibility to pair Bluetooth or ANT+ sensors here. This allowed you to pair heart rate, cadence and also power meters with Strava. Unfortunately, this feature was removed in the October 28, 2019. Since then, no external sensors can be connected to Strava.
As I said, tap “START” once and your activity will be recorded. Then your smartphone screen will display your data page. Only the most necessary values are displayed here:
- (activity) time
- Average speed
- Distance
More values are not displayed. A rather reduced bike computer thus.
A small card pin is displayed at the bottom right of the screen. Tap it to switch to the map view.
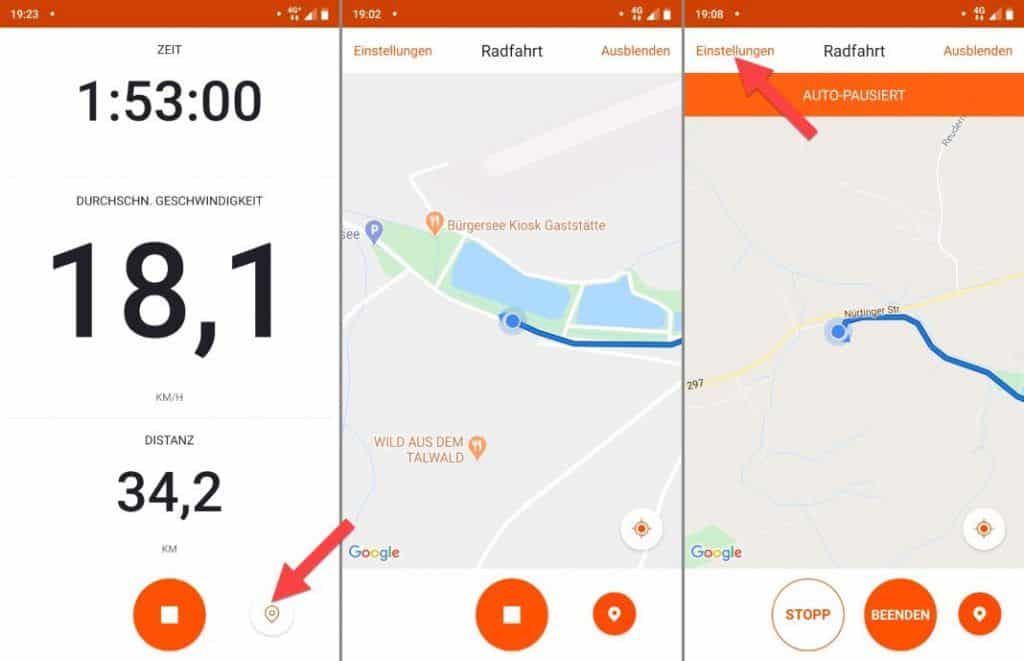
If you are on the “Record” screen, you can switch to the settings in the upper left corner. There you have the following options:
- Auto-pause: Can be enabled and disabled for cycling and for running activities. Strava then automatically calculates your standing time out of the activity time.
- Audio cues
- Beacon
- Live
- Screen display
- Sensors
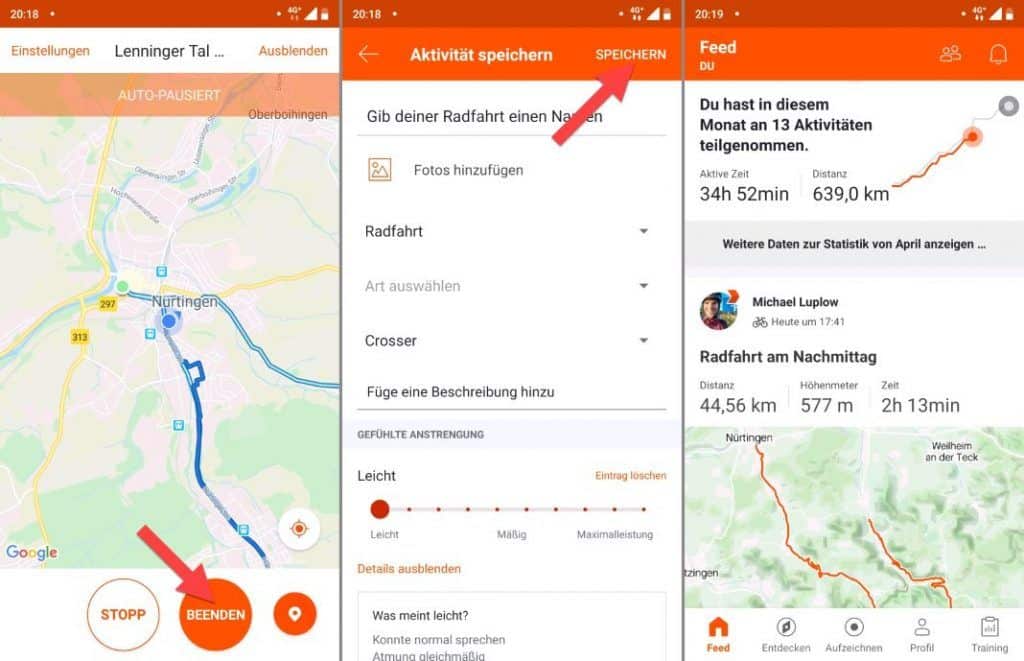
You completed your activity? Then tap END to stop recording. In the screen that appears, you can make the following settings: Name of the activity, type of sport and type of activity (none, training, competition), what equipment were you using? Choice of activity intensity. On this step, the privacy settings can be made. You can set the following – activity is visible for:
- All
- Subscribers
- Only you (private)
If you have set the visibility to “All” or “Subscribers” , then this group of people can see the activity in your profile. Otherwise the activity is only visible to you. This can be useful if you want to use Strava as a private training diary.
When you are done then tap Save. in the top right corner.
Strava: The ideal bike computer app?
How good is Strava as a bike computer app? After all, the smartphone is already attached to the handlebars – can you use the smartphone as a bike computer with Strava?
A clear answer: Strava displays very little information on the screen and is therefore not suitable as a bike computer app. Only time, average speed and distance covered are displayed. This is less information than is displayed by the simplest bike computers. External sensors can also not be paired with Strava (anymore). That’s clearly not enough information.
Unfortunately, the information that can be displayed can hardly be adjusted.
Tip: In this article, I’ll show you the best bike apps including the best bike computer apps.
Tip: You can get to know the complete series of Sigma bike computers better in this article.
Strava segments
The segments are one of Strava’s trademarks. Motivating factor of sports social network and numerous athletes around the globe are also segment hunting.
What are Strava segments?
Segments are highlights along the way. Segments can be created by any user and climbs are particularly popular with the Strava community. If you are on a segment, then the aim is to be the fastest on this segment. As a reward, you will be crowned KOM (King of the Mountain) or QOM (Queen of the Mountain) .
Strava segments can also be used for free.
Launch the Segemnt Explore function to view all available segments in your area on a map. You can find the Segment Explorer as follows:
- Android: Discover segments
- iOS: More
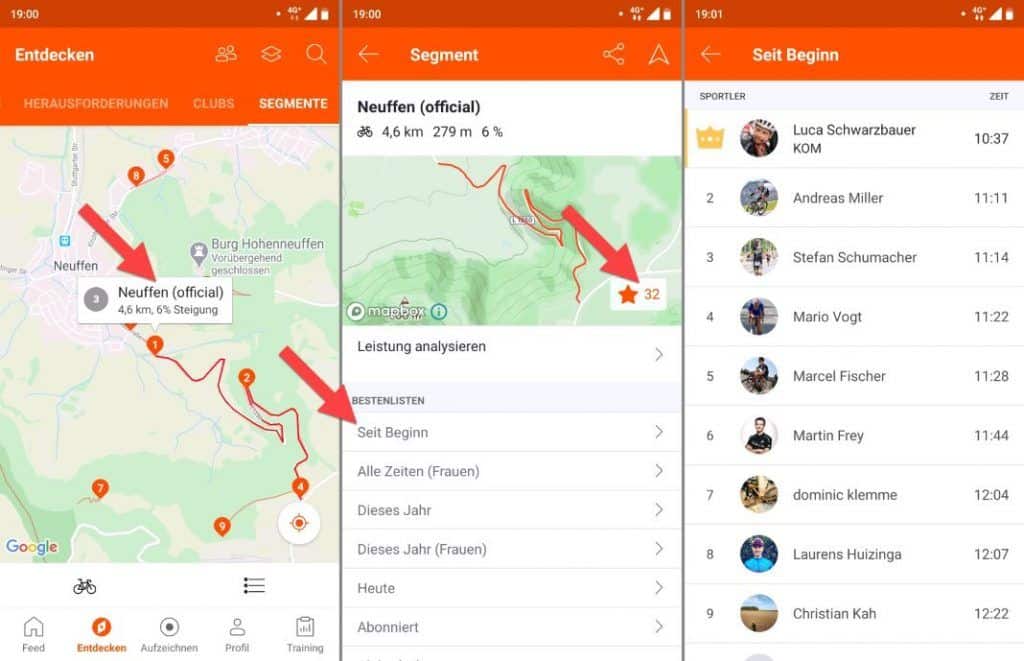
In the Segment Explorer there are also filter options, e.g. by activity (running or cycling) and you can display the most popular segments in your area.
Strava segments on the compter
Also on Strava.com in the browser there is the segments explorer too. Proceed as follows:
- On strava.com/dashboard i.e. log in to your user account
- Discover > Segments Discover
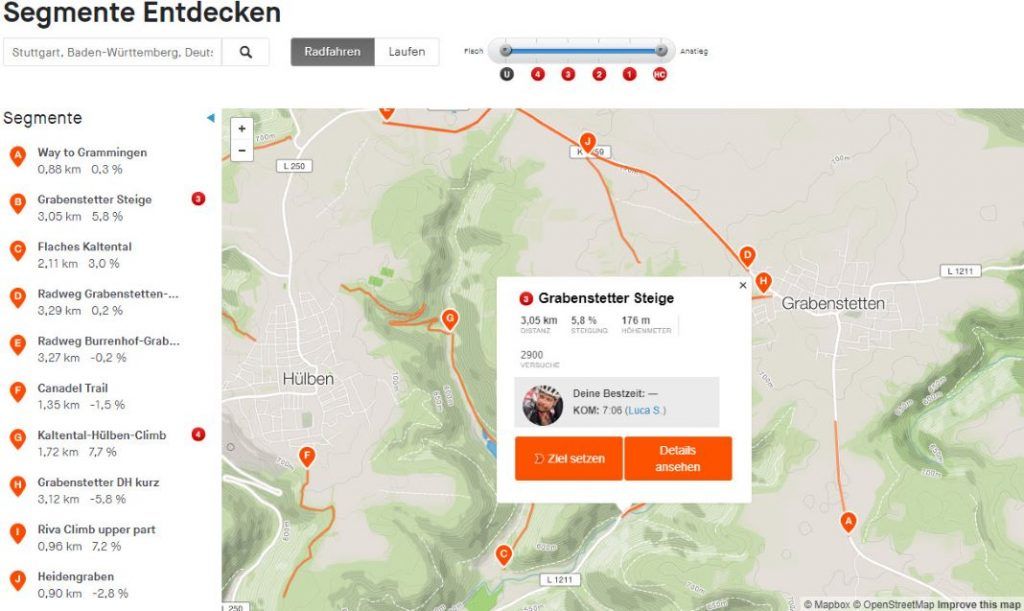
Here you have similar functions as in the app and can also display All, Flat, Hilly and Steep segments.
In the Discover Segments view on your computer or in the app, you can invite friends to segments and also mark segments with a star. If you have marked the segments, they belong to your “marked segments”.
Tagged items are treated as what Strava calls Strava Live Segments. Strava Live segments are supported by the Strava paid version and by many GPS bike computers.
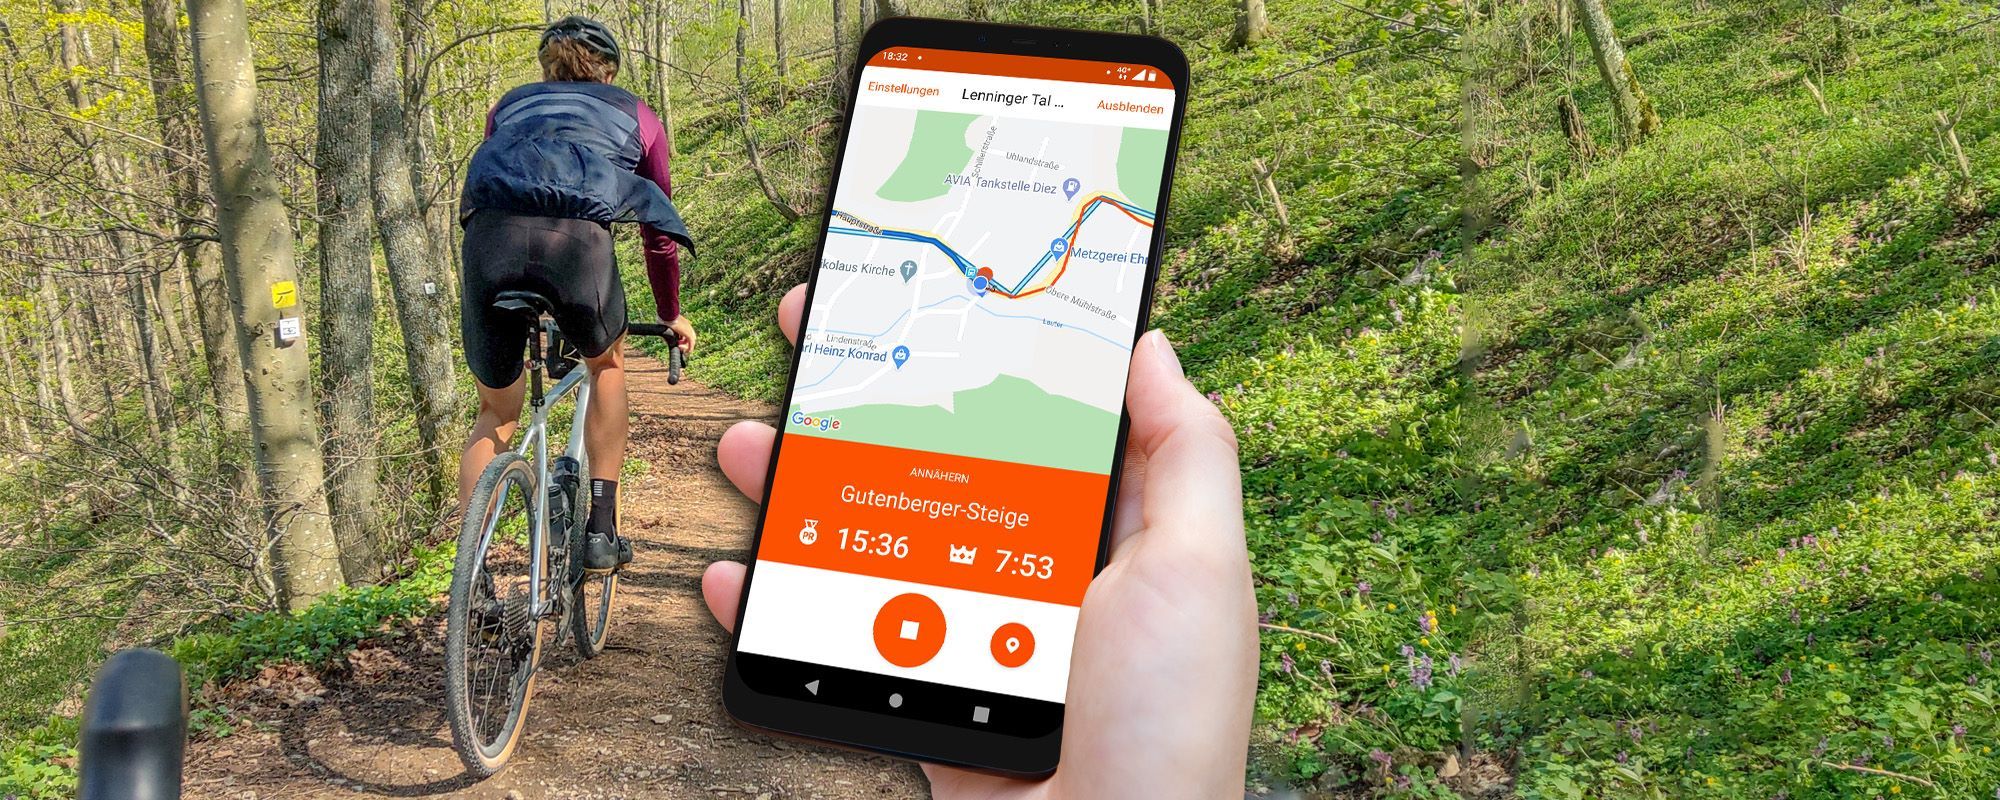
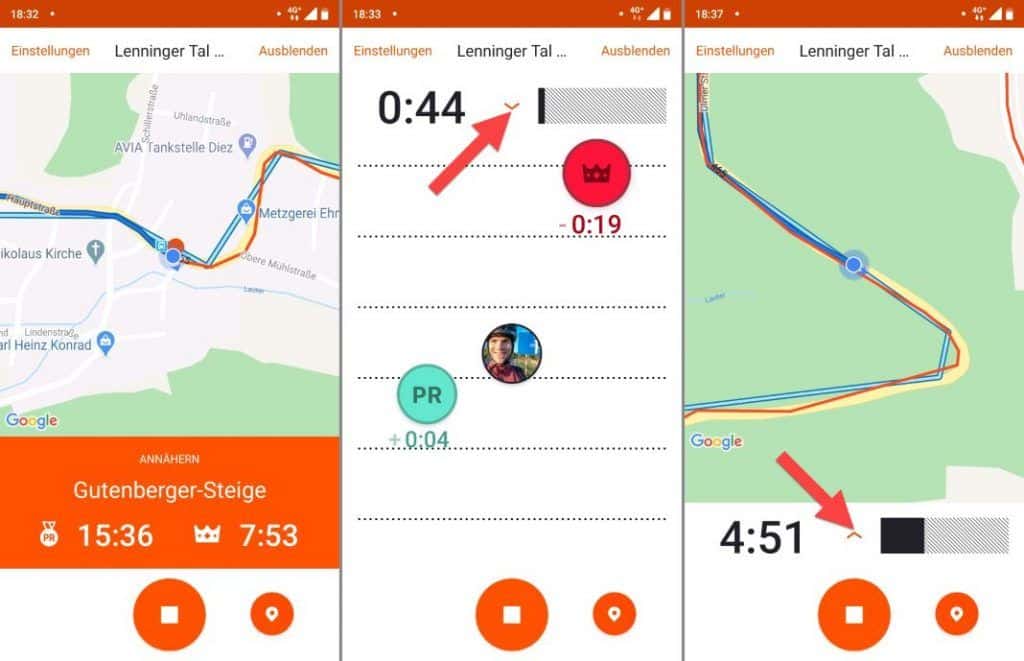
If you join a segment, you will be informed about the segment in advance by the Strava app. If you are cycling or running in a live segment, the app informs you about your current status in the segment: A motivating view is shown. There you can see your current performance in the segment. Your current time is compared to your own best time (PR = Personal Record) and the best time of the KOM (King of the Mountain) in the segment. The display of the map in the segment, instead of the live segment view is also possible.
Once you have completed the segment, you will receive a segment summary. When you upload your completed activity, it will then be matched with Strava. This compares your time in the segment with the times of other riders in the segment.
Der beste Mann wird dann als King of the Mountain (KOM) und die beste Frau als Queen of the Mountain (QOM) gekürt – und beide werden mit einer Krone belohnt 😉
You want to place yourself on the segment leaderboard or even get the title? Then you need to upload your activity as public on Strava. Private activities are not listed on the segment leaderboard.
Numerous athletes around the globe are constantly on the hunt for new records and virtually addicted to Strava segments.
Strava Segments and Strava Summit
With Strava Summit, the paid subscription, there are a whole bunch of interesting additional features for the Strava segments:
Strava Segments – Summit Leaderboards: You can filter the leaderboard by e.g. athletes with your age and weight class.
Strava Live Segments on your bike computer: The Strava Live Segments can also be used with compatible bike computers. Simply mark Strava segments with a star on the map view in Segment Explorer. After the next data synchronization of the GPS bike navigator with Strava, the information for the live segment is then available on the bike computer and you can start rocking! Check out the official Strava support page(https://blog.strava.com/de/summit-live-segments/) to find out which devices support Summit Strava Live segments.
I can tell you already: These current Garmin GPS bike navigation systems are compatible and I have already tested them extensively for you:
- Garmin Edge 530: Go to the detailed Garmin Edge 530 field test (test & experiences)
- Garmin Edge 830: To the detailed Garmin Edge 830 field test (test & experiences)
- Garmin Edge 1030: Go to the detailed Garmin Edge 1030 field test (test & experiences)
Strava Segments and eBikes
Strava does not support Strava segments for eBikes.
For each of your Strava activities, you can set the sport. In the activity, this can be set with the “Sport” property.
There you can select, for example, Bike ride or E-bike bike ride.
If you now select the sport “e-bike cycling”, then no Strava segments are available.
If you select “Cycling” as your sport, your eBike activity will be mixed with the Strava segments of regular cyclists. Pretty sure this approach will soon draw the displeasure of regular cyclists. Probably sooner or later a dedicated KOM hunter from the community will get back to you. With a request to label your activity as E-bike ride.
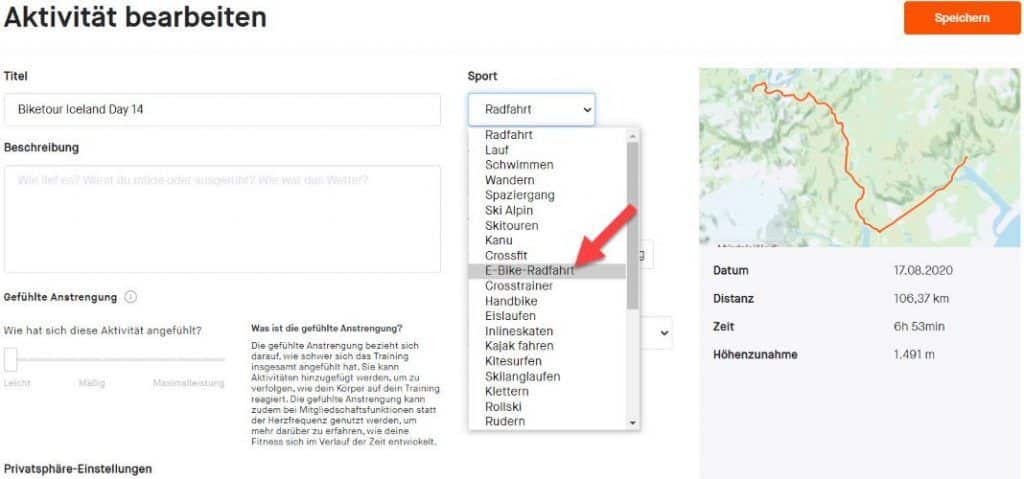
As mentioned, there are then again no Strava segments available. There is currently no solution to this problem.
Strava support for GPS hardware
Many GPS navigation devices, fitness watches, and activity trackers have a Strava interface. Once set up, activities are automatically uploaded to Strava.
The following manufacturers have integrated Strava into their devices and software:
- Garmin
- Wahoo
- Polar
- Suunto
- Amazfit
- Fitbit
- Samsung
- Bryton
- Pioneer
- Trainer Road
- Sigma Sports
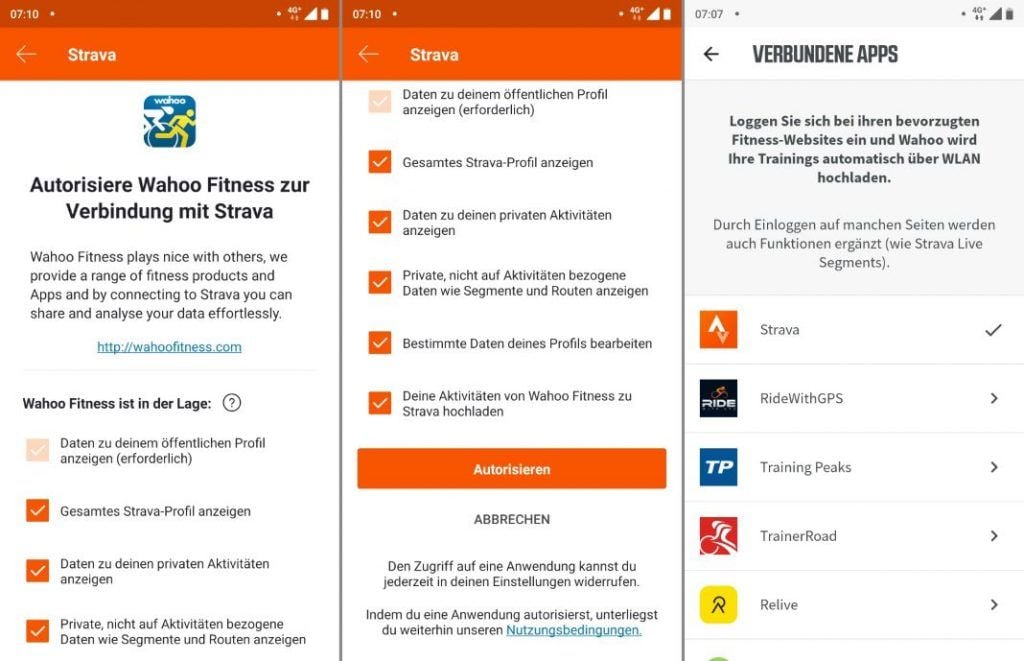
You can look up a current list of compatible manufacturers here (https://www.strava.com/upload/device).
In practice I have tested the synchronization with the following devices:
- Wahoo ELEMNT ROAM: To the detailed Wahoo ELEMNT ROAM field test (test & experiences)
- Garmin Edge 830: Go to the detailed Garmin Edge 830 field test (test & experiences)
With all devices, the synchronization worked perfectly, very fast and automatically after a one-time setup.
Using Strava with Wahoo
Wahoo ELEMNT ROAM: To the detailed Wahoo ELEMNT ROAM field test (test & experiences)
Using Strava with Garmin
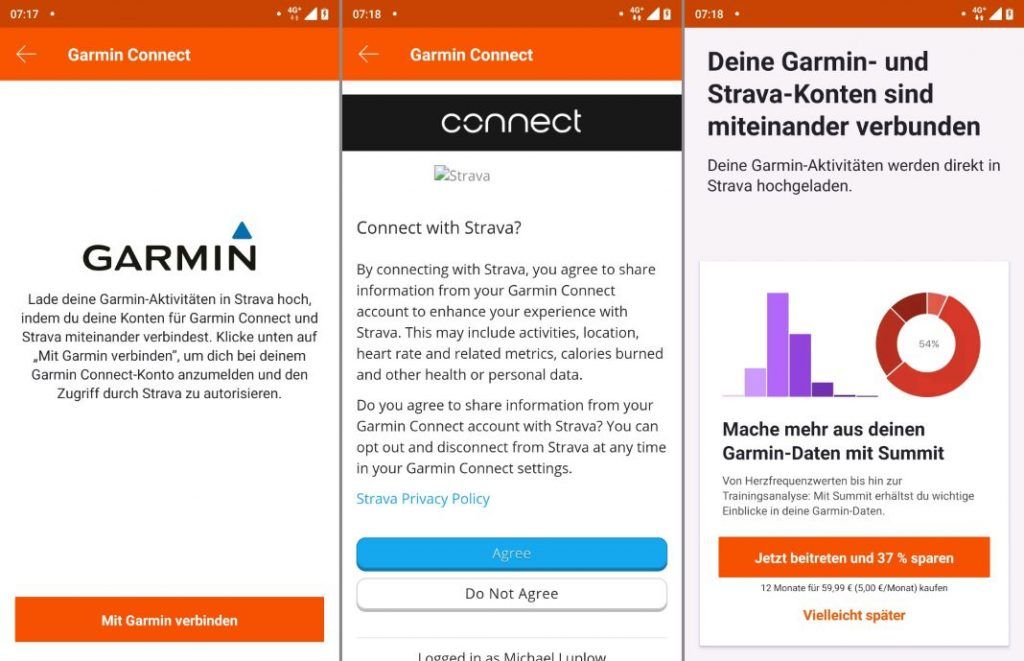
Garmin Edge 830: Go to the detailed Garmin Edge 830 field test (test & experiences)
Upload activities without app (Strava GPX Import)
What are the options for uploading your activities to the Strava platform? The easiest way is of course the Strava smartphone app.
You can do all this directly from your smartphone: record, upload and manage activities. On your computer, you can also upload files to Strava to record an activity. https://www.strava.com/upload/select
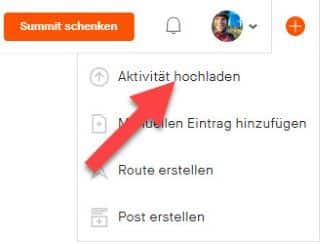
Strava also handles GPX import: If you are using a GPS navigation device such as a bicycle GPS navigator, then this method is a good choice. You ride your tour and record the activity with the bike GPS navigator. After the tour you upload the GPX file of the recorded tour to Strava. This works as well as with any GPS navigation device. With old as well as with current devices.
Garmin FIT and TCX import into Strava: Garmin FIT and TCX files have additional recorded fitness sensor data. You can also upload these file formats to Strava.
Strava route planner and navigation
A major update has been given to the Strava route planner. With the new version you can now comprehensively prepare your next bike tour. In this article you will learn everything about the Strava route planner and which features are useful for you.
Strava is the largest social network for athletes and cycling fans. Strava is particularly popular for its segments – we have already clarified this above in the article 😉 With the Strava route planner you can plan your next bike trip. What makes the Strava route planner different from e.g. komoot? Strava Segments: The planned route can be enriched with segments for extra motivation. You can then navigate as you follow along.
Plan routes with Strava
The Strava route builder (Strava ROUTE BUILDER) is currently still in beta. With this route planner you can create a route, save the route in your profile and then navigate yourself with the Strava app.
You can easily access the Strava route planner in your web browser: www.strava.com/routes/new. ROUTE BUILDER is currently only available on the desktop and not in the Strava app.
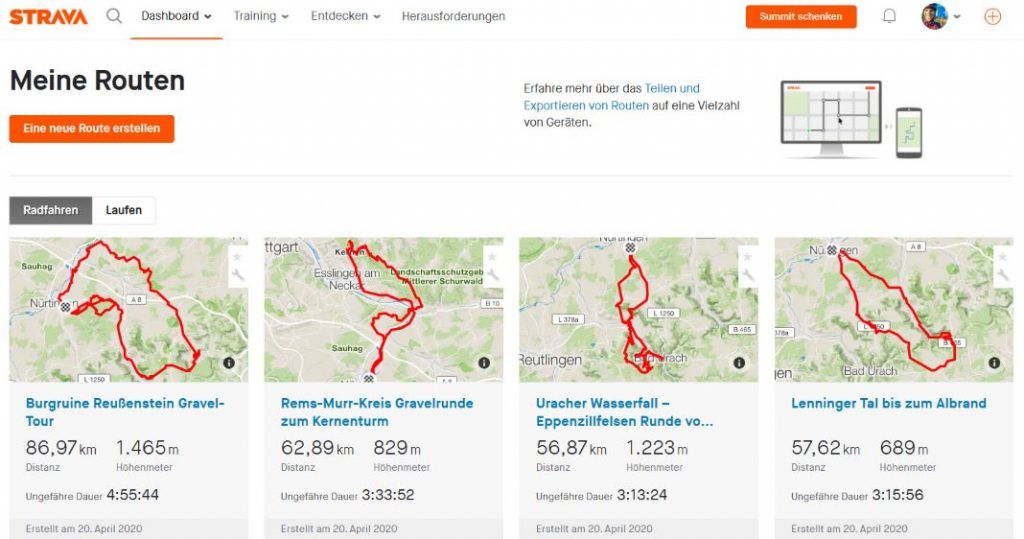
This is how easy it is to use the Strava route planner:
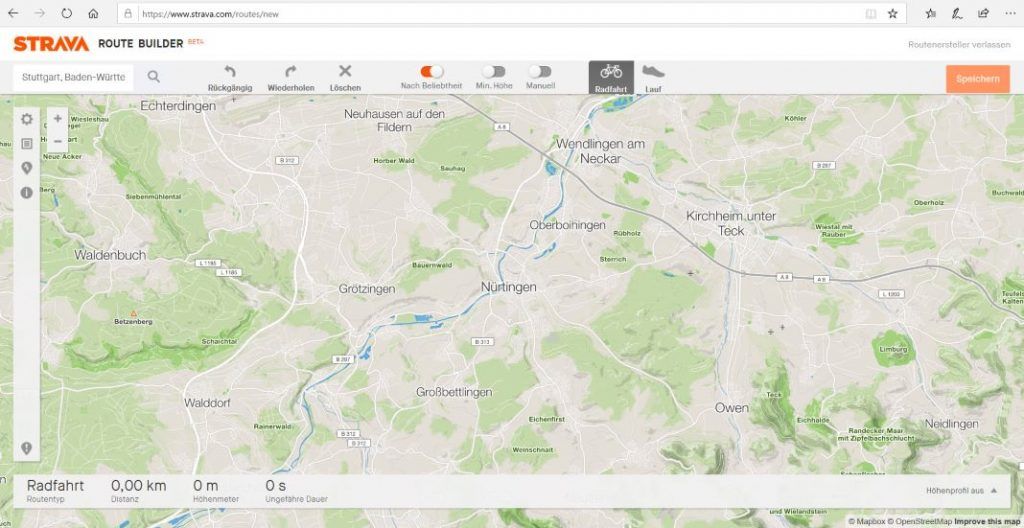
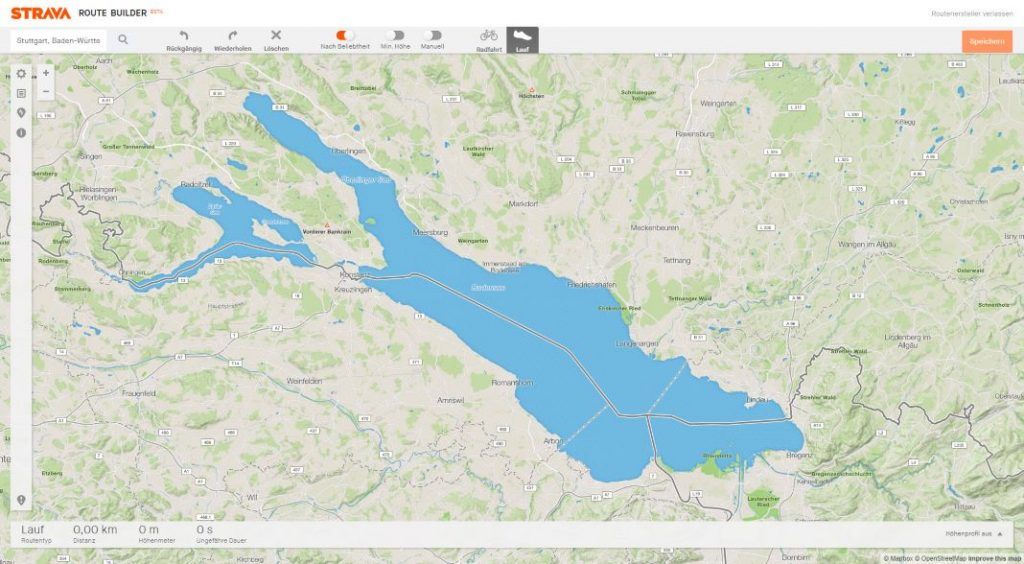
- To the top left of the search box at “Enter a location” do just that: Enter your current location and hit enter. The map section jumps to the entered location
- In the top bar you can choose the activity: bike ride or run. Select cycle.
- In the bar you can make further settings e.g. activate the route calculation by popularity.
- Click with the mouse on a point on the map, to create the starting point.
- To create the target point, click on the map again.
Now Strava calculates your route based on your settings. For example, a bicycle route is created. Based on the most popular routes. Since Strava is especially popular with road cyclists, the routes created are often very suitable for road cycling.
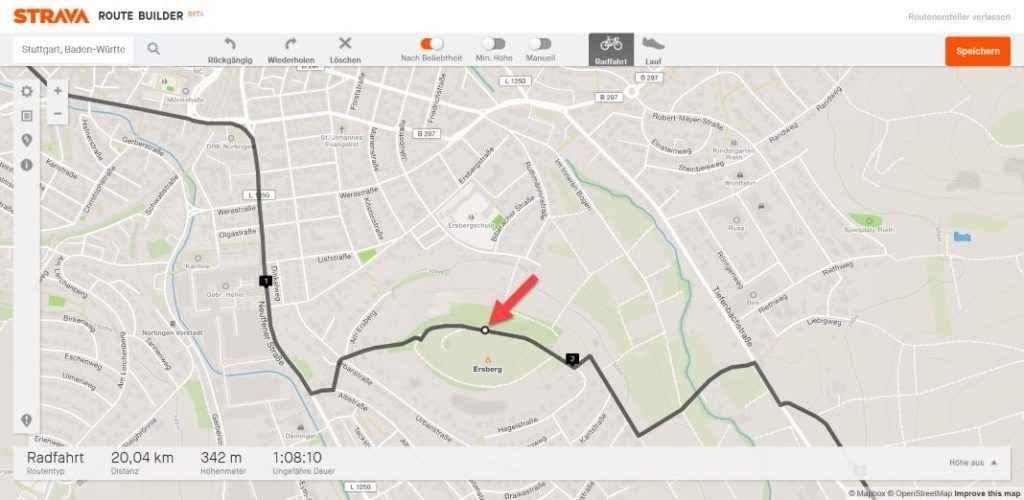
You want to change the created route? With a click on the planned route you can set an intermediate point. You can then drag and drop the intermediate point. As you move the waypoint on the map, Strava Route Planner immediately shows you your newly calculated route.
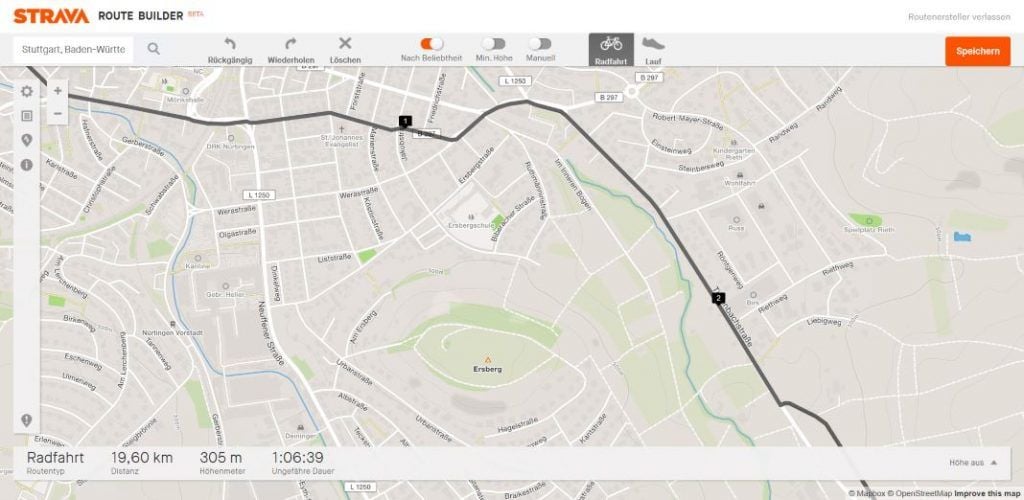
You’re satisfied? Then just let go of the intermediate point.
You want to delete an intermediate point? Simply click with the right mouse button.
In the wide sidebar on the left you can adjust the map settings. Here you can:
- Change map view: Choice between OSM, standard and satellite maps.
- Heatmap: Enable and disable the Global Heatmap on the map (show and don’t show popular routes).
- Display distance markers on the planned route or not.
- convert units to kilometers or miles
If the route calculation is set to popularity (top bar), then the Strava route planner is very much based on the Strava heatmap. Planning a route far away from the heatmap is then hardly possible. Do you want to plan your route freely? Then just turn off the route calculation by popularity with a click on the slider.
Strava currently does not handle GPX import.
Add Strava segments to the track
A highlight of Strava is also available in the Strava route planner: The Strava segments! You can enrich your planned tour with Strava segments. You can find the function in the left bar:
- Click on the “Discover segments” function there.
- Then activate the segments slider
- you also have many filter options
So now we will display all the filters all the segments corresponding to the set filter. Unfortunately, there is no way to easily integrate the segments into your tour. You have to schedule the segments Manuel in your tour i.e. you see the course of the segment. You must then plan your planned tour manually on the route of the segment. Here I would have liked that Strava makes a the segments conveniently integrated into the tour by mouse click.
When you move the map view, the segments are not automatically reloaded. You need to click on the Update button in the sidebar on the left itself. This should also work more comfortably.
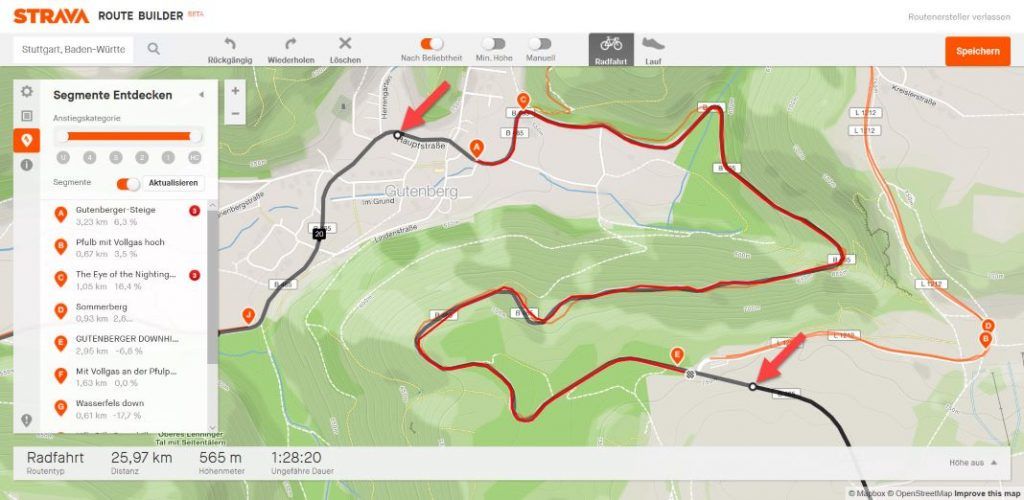
The segments function in the Strava route planner (ROUTE BUILDER) works rather rudimentary. Strava needs to deliver improvements here! For example, it should be easier to integrate segments into the route with a click of the mouse, or you can click together your favorite segments and Strava calculates a suitable route from them.
Tip: When you have planned a route, you will see a list of segments on the planned route at the bottom of the screen.
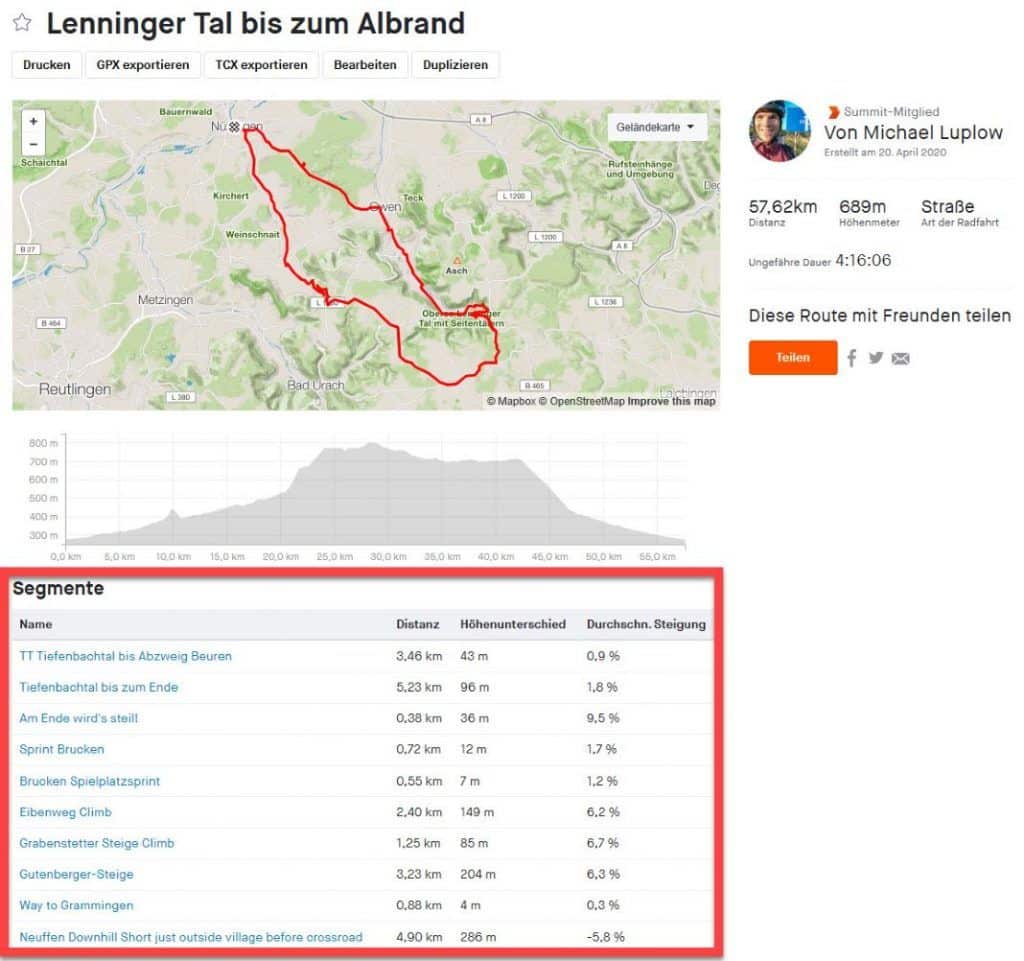
But this list is also missing an important convenience feature: You want to use live segments on your GPS bike navigation system? So on a navigator from e.g. Garmin, Wahoo, etc.? Then you must first mark the segment with a star. It would be very convenient if you can do this directly in the list. Unfortunately, this function does not exist. I now describe the current possibility.
How to activate Strava live segment by segment on your planned route:
- click on each individual segment on the map
- then click on “View Details”
- then mark the segment with an asterisk
You can use the routes created and saved with the Strava route planner in many different ways:
- Strava routes can be used directly in the Strava app
- You can use Strava routes on your GPS bike navigator from Garmin, Wahoo, Sigma and Co.
Now you can find out how this works.
Export Strava routes as GPX (Strava GPX Export)
Planned Strava routes can be easily exported as GPX files. You can then use the GPX file in many ways. For example, you can further edit the file with an application like komoot route planner. Or you can transfer the route to your bike GPS navigation system.
This is how the Strava GPX export works:
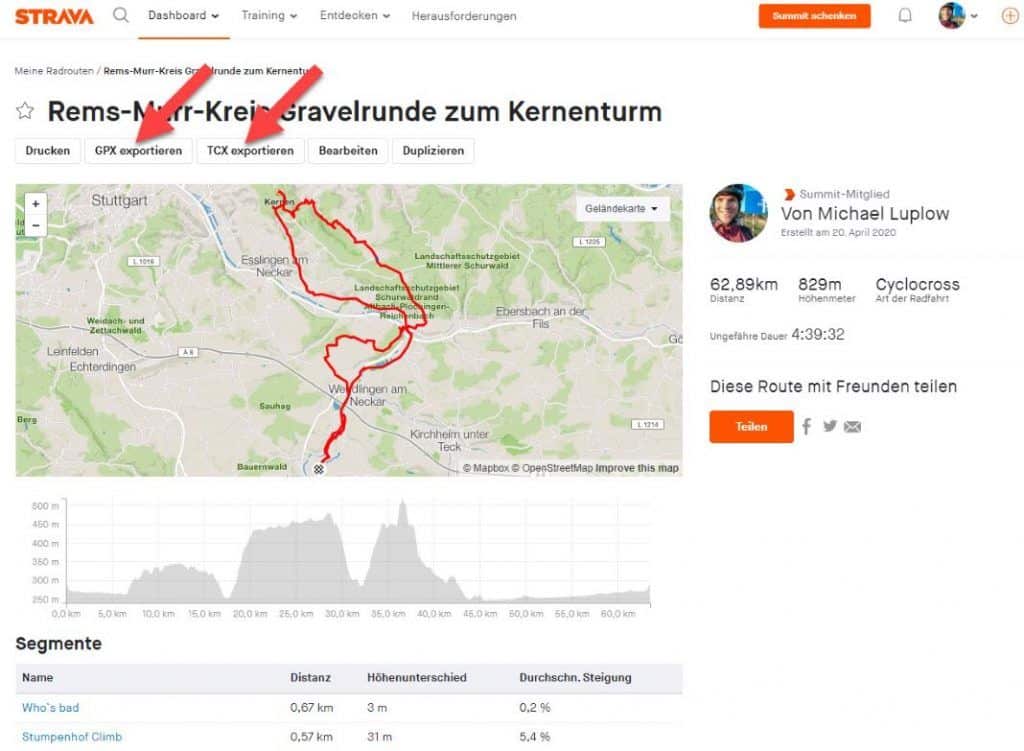
- Access the “My Routes” page: Dashboard > my routes
- Now the overview of your planned routes is displayed
- Click on the desired route to open it
- Directly under the route title there are two buttons: “Export GPX” and “Export TCX”.
- Click on the button of your choice to start the download
Navigation: Use routes in the Strava app
You can easily use routes created and saved with the Strava route planner in the Strava app:
- Tap the “Record” menu.
- Tap the left icon “Routes”
- Now you see a list of your planned routes. By tapping on the button “Use route” you can load the route.
- Tap “START” to start the activity with the planned route
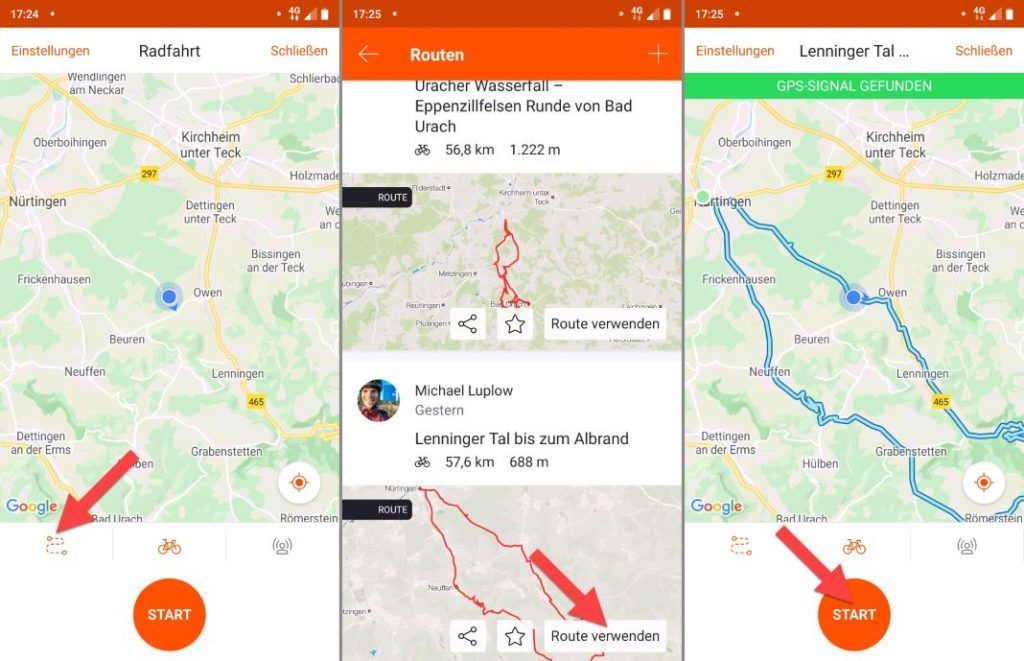
The navigation is spartan: While driving, your planned route is displayed as a line on the map. There are no more functions. The map doesn’t rotate and Strava doesn’t show turn-by-turn directions.
Navigation with Strava is thus limited to the basic functions.
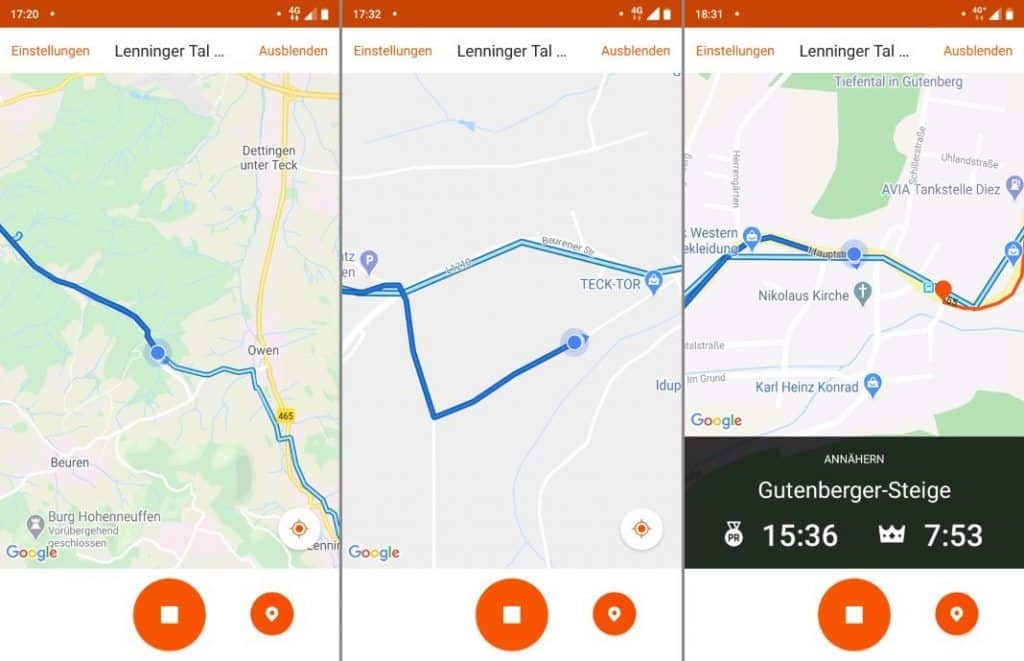
Strava segments are displayed on the map. So you see when you approach a segment. Your segment time is displayed in the segment. You already learned how Strava behaves within a segment earlier in the article.
Conclusion
Strava is a social network for athletes. It is also an online tour diary or training log.
If you wish, you can upload all your activities to Strava. This way you have a list of all your activities and can use numerous useful evaluations. Big advantage: Your central tour diary is device independent. Just about all current GPS navigation devices, sports watches and also many fitness trackers are compatible with Strava. The data from these devices can then be automatically synchronized to Strava (after one-time setup).
If you buy a new fitness device in the future, it will most likely be compatible with Strava.
Best lists and segments motivate and make the own performance comparable with other athletes.
Who is Strava suitable for? For all athletes who want to keep their fitness data or who like to compare themselves with others. For people with privacy concerns, Strava is rather not suitable. Once set up, activities are automatically uploaded from the GPS bike computer to Strava, making it easy and worry-free to use.
Conclusion Strava route planner and navigation
Strava comes from the sport of road cycling. You can clearly see this with Strava route planner – both good and bad. The route calculation is particularly aimed at racing cyclists. Of course, this is also due to the Strava heatmaps.
The routes are not suitable for mountain bikers, as normal roads are strongly preferred. There are also more suitable applications for touring cyclists.
The Strava route planner is still in BETA and accordingly the range of functions is reduced. The top bike route planners such as komoot deliver far greater functionality.
Functions that would be useful for the future:
- Convenient integration of Strava segmentsn the planned route.
- Import option for GIF files: This would allow route planning with another bike route planner. For navigation you could then use Strava.
- More convenient navigation incl. Map rotation and turn-by-turn directions
- Adapt the route planner to the needs of touring cyclists and mountain bikers.
Good
✅ Largest social network for sports
✅ Extensive evaluation options
✅ Motivate leaderboards and Strava segments
GPX export possible
✅ Available for web and for Android, iOS
✅ Usable via app or with almost all current bike GPS navigator, sports watch, fitness tracker
Bad
❌ Strava route planner and navigation are limited to the basic functions
❌ Route import via GPX only possible via external tools
❌ Data protection concerns
KOM driving (chasing the Strava segment best time) can cause you to race
❌ Rankings partly distorted by e-bikers
Strava Alternatives
Strava as a social network for athletes and as a training diary is unique. The presented Strava alternatives have their focus on other areas and offer themselves as a useful addition to Strava.
komoot
komoot offers editorially prepared outdoor tours provided by the community. Here you can get inspired. At the same time, the komoot route planner is one of the most versatile on the web. The operation remains so simple that even beginners can quickly find their way around. An outdoor navigation system is also integrated into the app. The basic version is free of charge. A one-time purchase unlocks features such as worldwide offline navigation and interfaces to hardware bicycle GPS Navis. komoot is available as an app for iOS and Android and on the web.
To the detailed komoot test (test & full instructions)
What is your experience with Strava and the Strava route planner? Do you have any questions? Shrine me with pleasure your comment.
Guidebook
Use Strava Summit for free for 30 days and cancel directly (Android):
- Launch Google Play Store
- Open the burger menu (three lines in the upper corner) by tapping on it.
- Select menu item “Subscriptions
- Tap the Strava Summit subscription there
- Tap on cancel and confirm all further steps
Now you can try Strava Summit for free for 30 days. You can continue to use Strava after the trial period without the payment features. Of course, you can always buy Strava Summit again in the Strava app.
Even though I’m an intensive Strava user, I don’t need the subscription features. The price is also overpriced in my opinion.
Reading tip: You want more inspiration? In the article The Best Bicycle Apps, I’ve provided even more handy digital helpers for you. Find the best apps for bike & bike travel from navigation, training, MTB, bike computer, transportation, accommodation, communication and more.

